> For the complete documentation index, see [llms.txt](https://docs.openg2p.org/llms.txt). Markdown versions of documentation pages are available by appending `.md` to page URLs; this page is available as [Markdown](https://docs.openg2p.org/1.3/social-registry/features/individuals-and-groups/user-guides/create-an-individual-registrant.md).
# Create an Individual Registrant
Social Registry
This document provides instructions to create an Individual Registrant in the ***Social Registry*** module.
## Prerequisites
* The user must have Registrar and Administrator role.
* The user must have access to the Social Registry module.
## Procedure
1. Use the link ***socialregistry.explore.openg2p.org*** to access Social Registry.
2. Click the main menu icon  and select ***Social Registry***.
***Social Registry*** screen is displayed.
2. Click the ***Individual*** in the menu bar.
***Individual*** screen is displayed.
3. Click the ***New*** button.
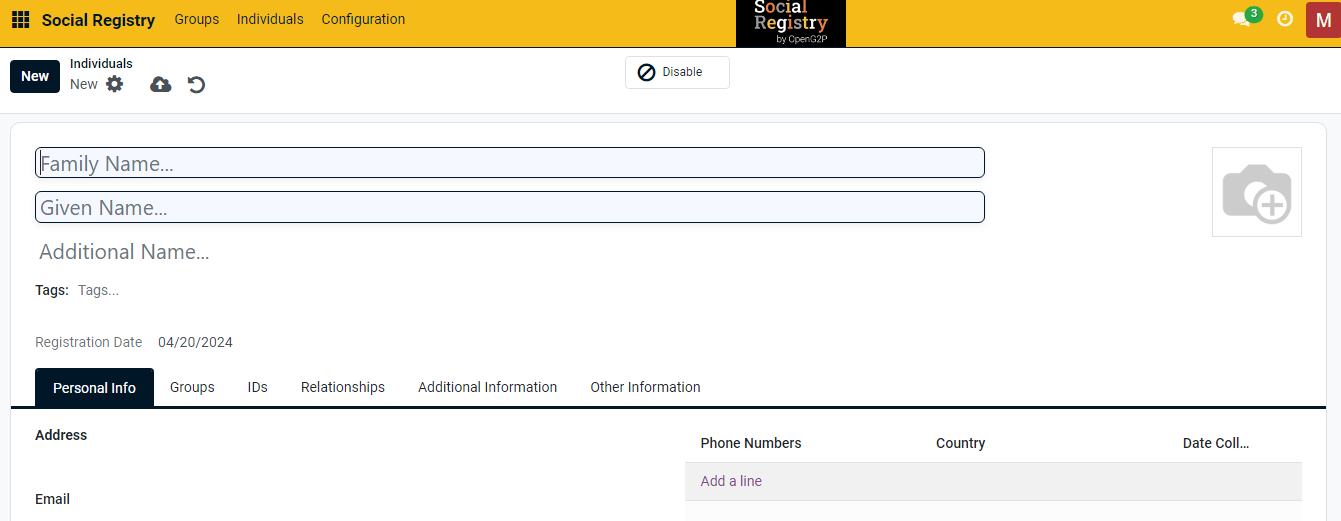
***Individual New*** screen is displayed.
The fields and their descriptions are given below:
Field
Description
Family Name
Enter the family name of the individual. It is a mandatory field.
Given Name
Enter the given name of the individual. It is a mandatory field.
Additional Name
Enter the additional name of the individual. It is a optional field.
Add the individual photo.
Tags
Select the appropriate tag from the drop-down.
Registration Date
Displays the current date by default
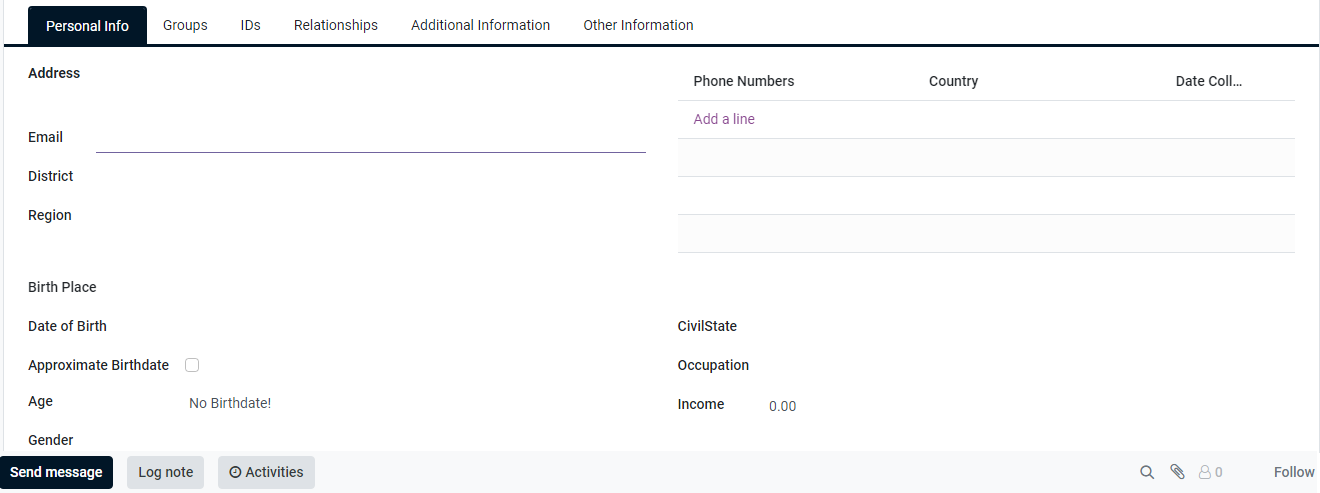
4. Click the ***Personal Info*** tab.
The fields and their descriptions are given below:
| Field | Description |
| --------------------- | ---------------------------------------------------------------------- |
| Address | Enter the Address of the individual |
| Email | Enter the Email of the individual |
| District | Enter the district name of the individual |
| Region | Ener the region of the individual |
| Birth Place | Enter the birth place of the individual |
| Date of Birth | Enter the date of birth of the individual |
| Approximate Birthdate | Check the box, if the date of birth of the individual is not available |
| Age | Enter the approximate age |
| Gender | Select the appropriate option in the drop-down. |
| CivilState | Enter the civil state of the individual |
| Occupation | Enter the occupation of the individual |
| Income | Enter the income of the individual |
| Disable | Click the Disable button to disable the data |
5. Click the ***Add a line***.
6. Enter the ***Phone Numbers***, ***Country***, and ***Date Collect***.... of the individual.
| Icon | Click to |
| ------------------------------------------------------------------------------------------------------------------------------------------------------------------------------------------------------------------------------------------------------ | ------------------------------------------------------------------------------------------------------------------------------------------------------------------------------------------------------------------- |
| |
Select the appropriate value. The available values are:
Archive
Duplicate
Send SMS Text Message
Download (vCard)
Privacy Lookup
Grand portal access
|
| | Save manually the individual data and exit from the screen |
| | Discard changes and exit from the screen |
The newly created individual registrant gets added in the existing individual list.
This completes the creation of individual registrant in ***Social Registry*** module.
---
# Agent Instructions
This documentation is published with GitBook. GitBook is the documentation platform designed so that both humans and AI agents can read, navigate, and reason over technical content effectively. Learn more at gitbook.com.
## Querying This Documentation
If you need additional information that is not directly available in this page, you can query the documentation by asking a question.
Perform an HTTP GET request on the following URL with the `ask` and `goal` query parameters:
```
GET https://docs.openg2p.org/1.3/social-registry/features/individuals-and-groups/user-guides/create-an-individual-registrant.md?ask=&goal=
```
`ask` is the immediate question: it should be specific, self-contained, and written in natural language.
`goal` is what the user is ultimately trying to achieve, the reason they need the answer. Sharing it helps GitBook give you a better, more relevant answer. A goal is most helpful when it describes the outcome the user wants rather than restating the question. For example, with `ask=how do I create an API token`, a goal like `automate deployments from our CI pipeline` lets GitBook tailor the answer to that use case.
The response will contain a direct answer to the question and relevant excerpts and sources from the documentation.
Use this mechanism when the answer is not explicitly present in the current page, you need clarification or additional context, or you want to retrieve related documentation sections.



 |
|  | Save manually the individual data and exit from the screen |
|
| Save manually the individual data and exit from the screen |
|  | Discard changes and exit from the screen |
The newly created individual registrant gets added in the existing individual list.
| Discard changes and exit from the screen |
The newly created individual registrant gets added in the existing individual list.