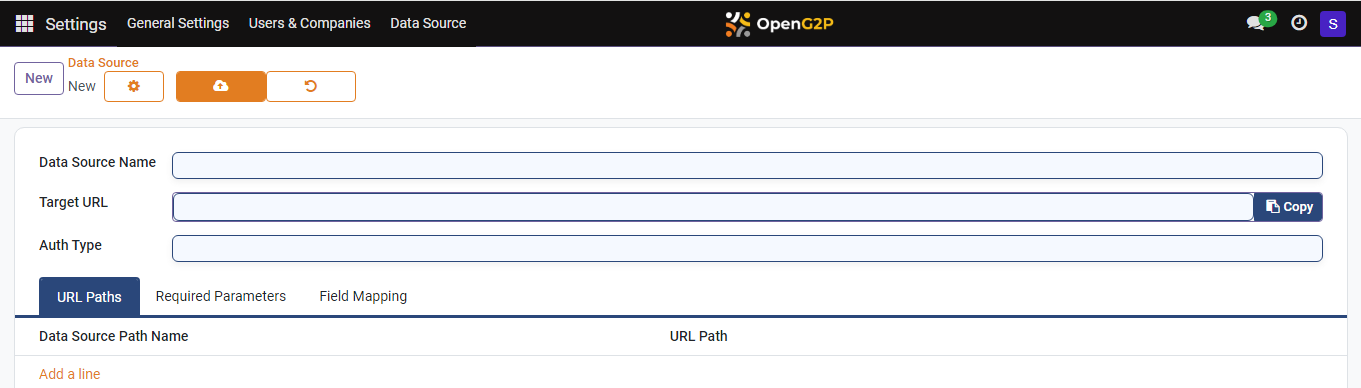
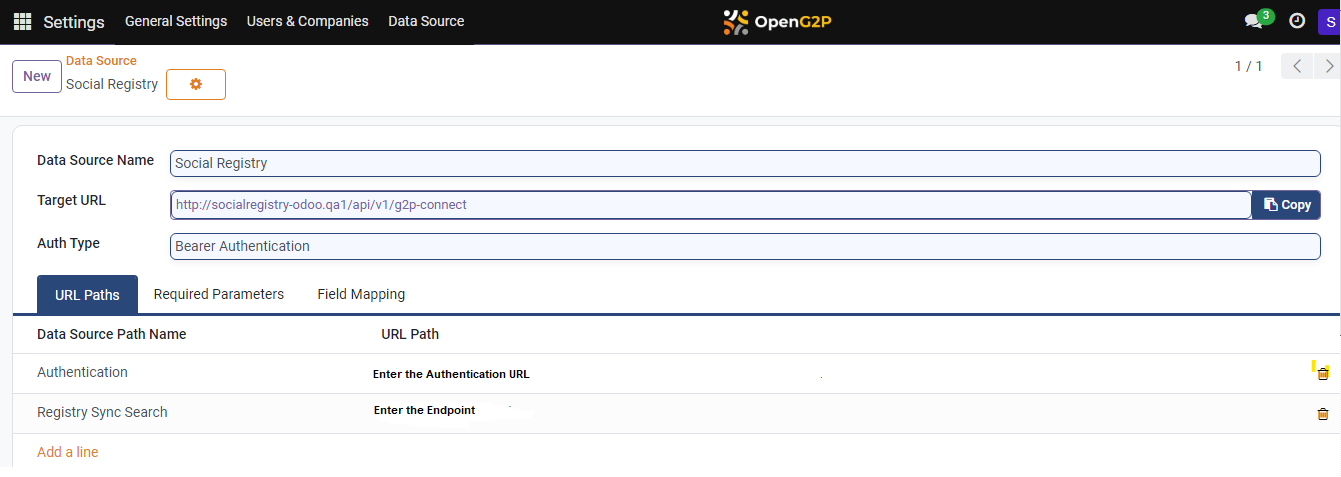
# Import Social Registry Data into PBMS

This document provides instructions to import data from the Social Registry (SR) into Program Beneficiary Management Systems' (PBMS) individual/group registries.

## Prerequisites

* A user must have an Administrator role to access the OpenG2P systems.

## Procedure

You must follow the procedures listed below to import data from the SR into the PBMS.

* [Configure SR into PBMS](#configure-sr-into-pbms)
* [Import data from the SR into PBMS](#import-data-from-sr-into-pbms)

### Configure SR into PBMS

1. Click the main icon ![](https://1895884874-files.gitbook.io/~/files/v0/b/gitbook-x-prod.appspot.com/o/spaces%2FnKdOHLbjDdIln1QDNwSx%2Fuploads%2Fgit-blob-04035215d78b73c4cc8238ae5303c552b094ec15%2Fmenu-icon.png?alt=media) and select ***Settings***.

<figure><img src="https://1895884874-files.gitbook.io/~/files/v0/b/gitbook-x-prod.appspot.com/o/spaces%2FnKdOHLbjDdIln1QDNwSx%2Fuploads%2Fgit-blob-611d791a93064404ef9cdb0239732dd08c304ccb%2Fpbms-settings%20(1).png?alt=media" alt=""><figcaption></figcaption></figure>

***Settings*** screen is displayed.

<figure><img src="https://1895884874-files.gitbook.io/~/files/v0/b/gitbook-x-prod.appspot.com/o/spaces%2FnKdOHLbjDdIln1QDNwSx%2Fuploads%2Fgit-blob-6a02ced30633b7ae6ceda8abf789868c009a40e8%2Fpbms-datasource.png?alt=media" alt=""><figcaption></figcaption></figure>

2. Click the ***Data Source*** tab.

***Data Source*** screen is displayed.

3. Click the ***New*** button.

***Data Source New*** screen is displayed.

<figure><img src="https://1895884874-files.gitbook.io/~/files/v0/b/gitbook-x-prod.appspot.com/o/spaces%2FnKdOHLbjDdIln1QDNwSx%2Fuploads%2Fgit-blob-0416ae54b850e8e8045dce36282b483dfc622882%2Fpbms-datasourcenew.png?alt=media" alt=""><figcaption></figcaption></figure>

The fields and their descriptions are given below.

**Table 1: New data source**

<table><thead><tr><th width="189">Field</th><th>Description</th></tr></thead><tbody><tr><td>Data Source Name</td><td>Enter the source name from where the data is imported.</td></tr><tr><td>Target URL</td><td>Enter the URL for the API request from where the data is retrieved.</td></tr><tr><td>Auth Type</td><td><p>Select the type of authentication from the drop-down. It is used to verify the legitimacy of the user. The valid values are:</p><ul><li>Basic Authentication</li><li>Bearer Authentication</li><li>API Key</li></ul></td></tr></tbody></table>

4. Click the ***URL Paths*** tab.
5. Click the ***Add a line*** link.
6. Enter the ***Data Source Path Name*** and the associated ***URL Path***.

**Table 2: Icons and their functions**

| Icon                                                                                                                                                                                                                                                   | Click to                                                                                                                                                                                                                                    |
| ------------------------------------------------------------------------------------------------------------------------------------------------------------------------------------------------------------------------------------------------------ | ------------------------------------------------------------------------------------------------------------------------------------------------------------------------------------------------------------------------------------------- |
| <img src="https://1895884874-files.gitbook.io/~/files/v0/b/gitbook-x-prod.appspot.com/o/spaces%2FnKdOHLbjDdIln1QDNwSx%2Fuploads%2Fgit-blob-b6f0b2a4064d79d04550e0b271d00575206f0b10%2FActions.png?alt=media" alt="" data-size="original">              | <p>Select the appropriate value. The available values are:</p><ul><li>Archive</li><li>Duplicate</li><li>Change Password</li><li>Disable two-factor authentication</li><li>Send Password Reset Instructions</li><li>Privacy Lookup</li></ul> |
| <img src="https://1895884874-files.gitbook.io/~/files/v0/b/gitbook-x-prod.appspot.com/o/spaces%2FnKdOHLbjDdIln1QDNwSx%2Fuploads%2Fgit-blob-843f8175332ed2465f83d2585eae57031142fb1f%2Ficon-save-manually.png?alt=media" alt="" data-size="original">   | Save manually the individual data and exit from the screen.                                                                                                                                                                                 |
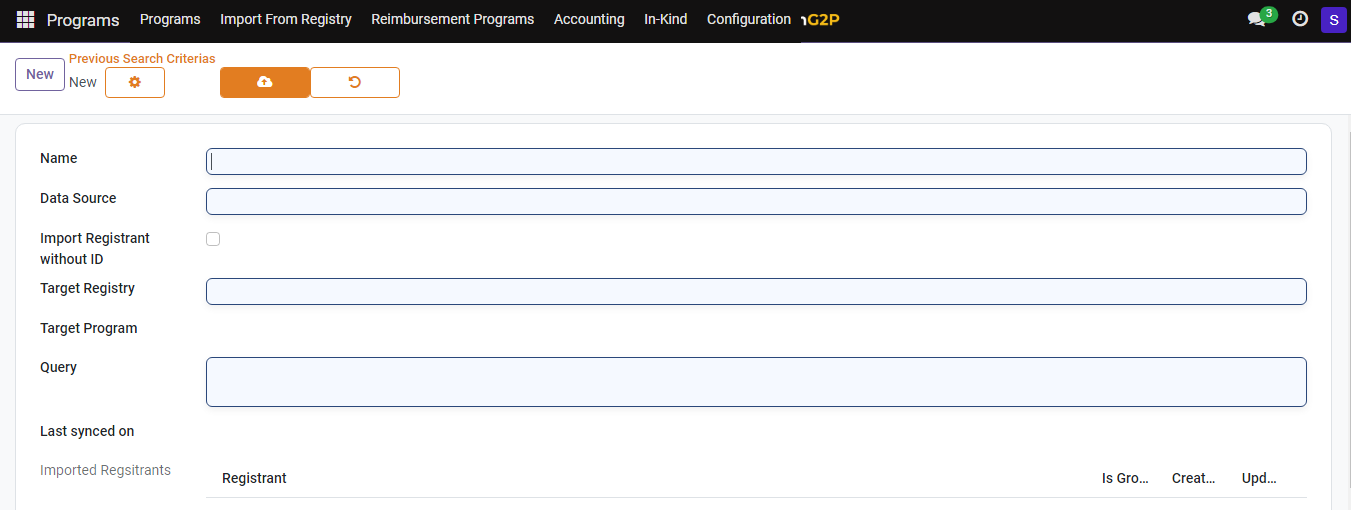
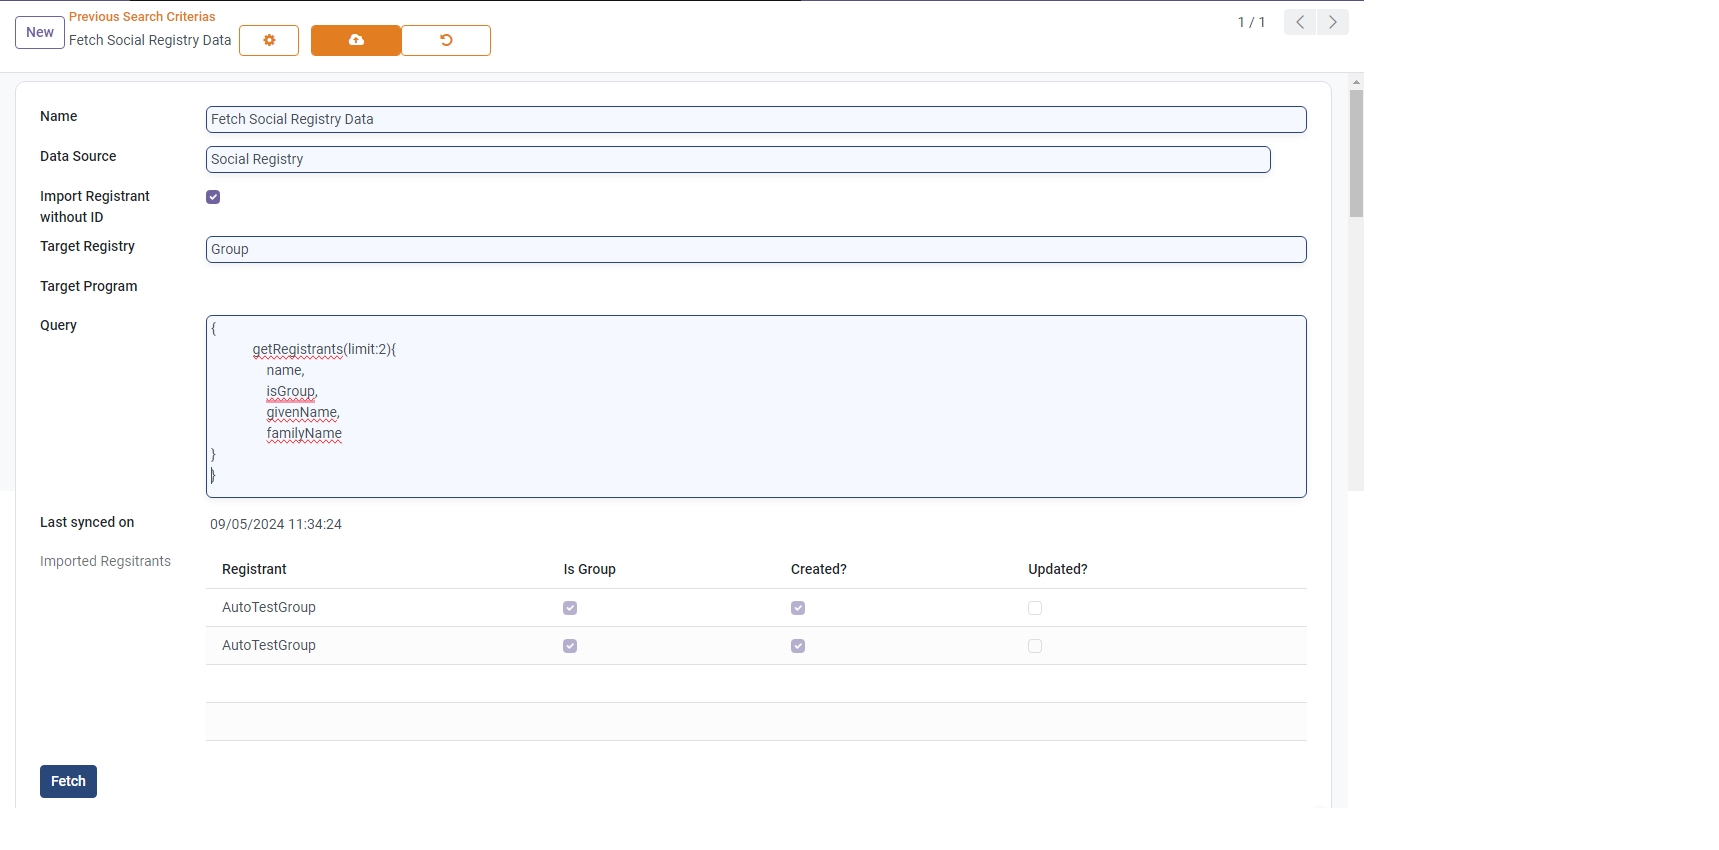
| <img src="https://1895884874-files.gitbook.io/~/files/v0/b/gitbook-x-prod.appspot.com/o/spaces%2FnKdOHLbjDdIln1QDNwSx%2Fuploads%2Fgit-blob-eaa9f395650b513ffba668e9638c701bce29630f%2Fdiscard-changes-icon.png?alt=media" alt="" data-size="original"> | Discard changes and exit from the screen.                                                                                                                                                                                                   |

**Sample data source screen**

<figure><img src="https://1895884874-files.gitbook.io/~/files/v0/b/gitbook-x-prod.appspot.com/o/spaces%2FnKdOHLbjDdIln1QDNwSx%2Fuploads%2Fgit-blob-f91e063a0795abaffd32a28f15da0738d60fd860%2Fsample-data-source.png?alt=media" alt=""><figcaption></figcaption></figure>

You can find the newly created data source listed in the ***Data Source*** screen.

<figure><img src="https://1895884874-files.gitbook.io/~/files/v0/b/gitbook-x-prod.appspot.com/o/spaces%2FnKdOHLbjDdIln1QDNwSx%2Fuploads%2Fgit-blob-9bba3da2a71c894f3b2e114093037052e8d41cc6%2Fpbms-datasource-list.png?alt=media" alt=""><figcaption></figcaption></figure>

### Import data from SR into PBMS

After configuring SR into PBMS, follow the below procedure.

7. Click the main icon ![](https://1895884874-files.gitbook.io/~/files/v0/b/gitbook-x-prod.appspot.com/o/spaces%2FnKdOHLbjDdIln1QDNwSx%2Fuploads%2Fgit-blob-04035215d78b73c4cc8238ae5303c552b094ec15%2Fmenu-icon.png?alt=media) and select ***Programs***.

***Programs*** screen is displayed.

8. Click the ***Import From Registry*** from the menu bar.

<figure><img src="https://1895884874-files.gitbook.io/~/files/v0/b/gitbook-x-prod.appspot.com/o/spaces%2FnKdOHLbjDdIln1QDNwSx%2Fuploads%2Fgit-blob-3940b4ca72f9fb6dea80a453cc1c02de0a799b77%2Fprogram-importregistry.png?alt=media" alt=""><figcaption></figcaption></figure>

***Previous Search Criterias*** screen is displayed.

9. Click the ***New*** button.

***Previous Search Criterias New*** screen is displayed.

<figure><img src="https://1895884874-files.gitbook.io/~/files/v0/b/gitbook-x-prod.appspot.com/o/spaces%2FnKdOHLbjDdIln1QDNwSx%2Fuploads%2Fgit-blob-ff3dd37398bc235b40db857d010fa0068099e717%2Fpbms-importregistrynew.png?alt=media" alt=""><figcaption></figcaption></figure>

The fields and their description are given below.

<table><thead><tr><th width="275">Field</th><th>Description</th></tr></thead><tbody><tr><td>Name</td><td>Enter the name of the new search criterias.</td></tr><tr><td>Data Source</td><td>Enter the name of the data source name as mentioned in Table 1 in the preceding section.</td></tr><tr><td>Import Registrant without ID</td><td>Check the box to import registrant without ID, if required.</td></tr><tr><td>Target Registry</td><td><p>Select the target registry from the drop-down. The valid values are:</p><ul><li>Group</li><li>Individual</li></ul></td></tr><tr><td>Target Program</td><td><p>Select the target program from the drop-down.</p><p>Note:</p><p>You can also use the <em><strong>Search More</strong></em> or <em><strong>Start typing</strong></em> options from the drop-down, to select the desired program.</p></td></tr><tr><td>Query</td><td>Enter the GraphQL query to import only the required data from the SR.</td></tr><tr><td>Last synced on</td><td><p>Enter the previous date of SR's PBMS synchronization to import data.</p><p>Note:</p><p>You can also use the calendar widget feature to select the date.</p></td></tr><tr><td>Imported Registrants</td><td><p>Shows the imported registrants' information.</p><p>Registrant - Displays the name of the group/individual</p><p>Is Group - Shows if the registrant belongs to a group</p><p>Created - Shows</p><p>Updated - Shows if the registrant is updated.</p></td></tr></tbody></table>

10. Click the ***Fetch*** button to import the data from SR into relevant individual/group registries of PBMS based on the GraphQL.

| Icon                                                                                                                                                                                                                                                   | Click to                                                                                                                                                                                                                                    |
| ------------------------------------------------------------------------------------------------------------------------------------------------------------------------------------------------------------------------------------------------------ | ------------------------------------------------------------------------------------------------------------------------------------------------------------------------------------------------------------------------------------------- |
| <img src="https://1895884874-files.gitbook.io/~/files/v0/b/gitbook-x-prod.appspot.com/o/spaces%2FnKdOHLbjDdIln1QDNwSx%2Fuploads%2Fgit-blob-b6f0b2a4064d79d04550e0b271d00575206f0b10%2FActions.png?alt=media" alt="" data-size="original">              | <p>Select the appropriate value. The available values are:</p><ul><li>Archive</li><li>Duplicate</li><li>Change Password</li><li>Disable two-factor authentication</li><li>Send Password Reset Instructions</li><li>Privacy Lookup</li></ul> |
| <img src="https://1895884874-files.gitbook.io/~/files/v0/b/gitbook-x-prod.appspot.com/o/spaces%2FnKdOHLbjDdIln1QDNwSx%2Fuploads%2Fgit-blob-843f8175332ed2465f83d2585eae57031142fb1f%2Ficon-save-manually.png?alt=media" alt="" data-size="original">   | Save manually the entered data and exit from the screen.                                                                                                                                                                                    |
| <img src="https://1895884874-files.gitbook.io/~/files/v0/b/gitbook-x-prod.appspot.com/o/spaces%2FnKdOHLbjDdIln1QDNwSx%2Fuploads%2Fgit-blob-eaa9f395650b513ffba668e9638c701bce29630f%2Fdiscard-changes-icon.png?alt=media" alt="" data-size="original"> | Discard changes and exit from the screen.                                                                                                                                                                                                   |

**Sample previous search criterias screen**

<figure><img src="https://1895884874-files.gitbook.io/~/files/v0/b/gitbook-x-prod.appspot.com/o/spaces%2FnKdOHLbjDdIln1QDNwSx%2Fuploads%2Fgit-blob-9cecf4caa749881d0e27f403af34d63cfd0c0d1d%2Fsample-importregistryscreen.png?alt=media" alt=""><figcaption></figcaption></figure>

You can find the newly created one listed in the previous search criterias screen.

<figure><img src="https://1895884874-files.gitbook.io/~/files/v0/b/gitbook-x-prod.appspot.com/o/spaces%2FnKdOHLbjDdIln1QDNwSx%2Fuploads%2Fgit-blob-14cf033411c7cb3abea5a31cf60a23331d92ade5%2Fimportregistrylistscreen.png?alt=media" alt=""><figcaption></figcaption></figure>


---

# Agent Instructions: Querying This Documentation

If you need additional information that is not directly available in this page, you can query the documentation dynamically by asking a question.

Perform an HTTP GET request on the current page URL with the `ask` query parameter:

```
GET https://docs.openg2p.org/1.3/pbms/functionality/odk-importer/user-guides/import-social-registry-data-into-pbms.md?ask=<question>
```

The question should be specific, self-contained, and written in natural language.
The response will contain a direct answer to the question and relevant excerpts and sources from the documentation.

Use this mechanism when the answer is not explicitly present in the current page, you need clarification or additional context, or you want to retrieve related documentation sections.
