# Home

<div align="left"><figure><img src="/files/8rwVUMB4AFHQTZQDkZ50" alt="" width="375"><figcaption></figcaption></figure></div>

[OpenG2P](https://openg2p.org) is an open source platform that provides the foundation to build government-to-person (G2P) solutions. The roots of the platform lie in the social benefit delivery systems originally developed in response to the Ebola outbreak in Sierra Leone.

The platform offers people facing processes such as onboarding into schemes, identity verification, and cash transfers to their bank accounts. It also incorporates government department facing features such as the creation of registries and beneficiary lists, eligibility checks, scheme definition, payment disbursement and reconciliation.

OpenG2P is a Digital Public Good ([DPG](https://digitalpublicgoods.net/registry/openg2p.html)) recognized by the DPGA and has received contributions and support from multiple organisations and implementers. Its roadmap includes support for non-monetary benefits, proof of delivery, beneficiary management, secure registries, and decision making support.

The project, co-founded by the Government of Sierra Leone and UNDP and supported by [Mifos](https://mifos.org) in the early stages, is now housed in[ IIIT Bangalore](https://www.iiitb.ac.in/), a not-for-profit university in India.

<figure><img src="/files/0w6rzdeYbp1RT5Gsbx9u" alt=""><figcaption></figcaption></figure>


# Architecture

## Functional architecture

OpenG2P has a flexible architecture that allows governments and social benefit delivery systems to choose functionalities per their needs. The platform is built to allow inclusion and has supporting features. For example, beneficiaries in remote areas without network connectivity can be registered offline. The platform also supports multiple stages of approval with each approval carried out by a different officer.

<figure><img src="https://github.com/OpenG2P/openg2p-documentation/blob/1.0.0/.gitbook/assets/functional-architecture.png?raw=true" alt=""><figcaption><p>Functional Architecture</p></figcaption></figure>

{% hint style="info" %}
**External System Integrations**

Digital authentication can be facilitated using MOSIP or any other ID system as the platform is agnostic of ID systems.&#x20;

The platform can integrate with payment systems other than the three payment systems shown in the diagram. &#x20;
{% endhint %}

## Technical architecture

<figure><img src="https://github.com/OpenG2P/openg2p-documentation/blob/1.0.0/.gitbook/assets/technical-architecture.png?raw=true" alt=""><figcaption></figcaption></figure>


# Registration

## Introduction

In the OpenG2P platform, registration is a series of three processes - intake, recording, and verification. Intake is the process of gathering information from applicants while recording and verification are the processes to add the authenticated information to the [Registry](/1.0.0/secure-registry/registry). The platform verifies the applicant's details in the background by confirming the identity and demographic details of the applicant digitally.

Registration aims to provide detailed records for [Eligibility Assessment](/1.0.0/beneficiary-management/eligibility) in the [Registry](/1.0.0/secure-registry/registry). It must be noted that at this stage, the people are referred to as applicants or registrants. Once the applicants/registrants pass the eligibility criterion set by the program manager, they become eligible to enrol in the program and are referred to as beneficiaries.&#x20;

This is a pictorial representation of the OpenG2P registration process.

<figure><img src="https://github.com/OpenG2P/openg2p-documentation/raw/10c5eb7b0884c079607f48b07d63088f0a8523c7/.gitbook/assets/registration-process.png" alt=""><figcaption></figcaption></figure>

## Registration approaches

Registration can be carried out via multiple channels such as digital service windows/kiosks, social workers, local registration offices, door-to-door visits, referrals from other programs, etc. The registration approach can be either on-demand or administrative-driven. Three key features distinguish between these two approaches:

#### **Applicant-initiated vs program-initiated**

Whether the registration process was initiated by the applicant (on-demand) or by the program administrator (administrator-driven)

#### **Individual vs group registration**

Whether applicants registered themselves individually (on-demand) or registered as a group/family/household (administrator-driven)

#### **Continuous vs time-bound**

Whether applicants could register at the time of their choosing (on-demand) or had to apply in a specific time window (administrator-driven)

## Registration interfaces

While on-demand and administrative-driven approaches are two distinct models, the registration process operates in a spectrum between these two models. For example, a program may allow the applicants to register individually (on-demand) but may allow them to apply only in a certain time window (administrative-driven). OpenG2P platform has a flexible implementation and through its various [Registration Interfaces](/1.0.0/secure-registry/registration-methods) aims to cater to a combination of approaches across different registration modalities and programs.&#x20;

## Registration features

OpenG2P registration interfaces are key client-facing interfaces. The clients here could be the applicants, social workers, program administrators, program managers, etc. There are the main features offered by these interfaces:

#### **Authentic**&#x20;

The clients log into the system using their MOSIP ID/National ID allowing the information to be verified while it is being recorded. Additionally, logging in using National ID can pre-fill the information fields in an authentic manner.

#### **Always available**

OpenG2P's [Mobile Registration App](/1.0.0/secure-registry/registration-methods/offline-registration) allows social workers and field registration officers to record the applicant's information without any internet connectivity.&#x20;

#### **Secure**

The applicant's information is encrypted at rest and during transit allowing the information to be secure against malicious attacks.

#### **Privacy-preserving**

The platform allows for consent forms to be filled out and recorded before starting the intake. The recorded information is not used for any purpose other than the explicitly stated purpose in the consent form.&#x20;

#### Customizable intake

The applicant information is filled in using general intake sheets. These intake sheets can be customized per the assessment information required by the program.

#### Notifications

The platform can be configured to send [Notifications](/1.0.0/notifications) to the applicants via multiple channels such as email, sms, etc.&#x20;

## Developer References

[**API**](/1.0.0/api)

[**Code**](/1.0.0/guides/developer-guides)

## Guides

## FAQs

<details>

<summary></summary>

</details>


# Registration Interfaces

## Introduction

OpenG2P platform offers registration of persons into programs via the following interfaces:

1. Mobile registration app&#x20;
2. Self-registration by a potential beneficiary&#x20;
3. API-based registration by other systems

Agent-assisted registration supports [offline registration](/1.0.0/secure-registry/registration-methods/offline-registration) in areas where connectivity may be a challenge.

Registration can be done for individuals or groups like families, households, schools, etc.


# Mobile Registration App

## Introduction

The person's information is filled in [ODK](https://getodk.org/) forms on Android devices and submitted to the backend for further processing. The ODK application is integrated with a QR code scanning application that enables an automatic population of KYC data of the person in the form along with verification of digital signature establishing the authenticity of the card.

## Registration Process

* Program creation&#x20;
* ODK form template creation&#x20;
* Upload of form to ODK Central
* Assigning forms to agents
* Field registration by the agent using ODK Collect on an Android tablet/phone.
* Submission of form to ODK Central
* Addition of record to the registry&#x20;
* ID verification and KYC

A high-level view of the administrator-driven registration approach is given below:

<figure><img src="/files/ZPWv2xmU9j8ntzRzVnrp" alt=""><figcaption></figcaption></figure>

## ODK

ODK is an open source toolkit that uses offline forms to collect data.  ODK Collect is the client-side app while ODK Central is the server-side app.  Learn more about ODK [here](https://docs.getodk.org/).

## Offline Registration Mode

OpenG2P offers mechanisms to carry out registrations on the field in areas where Internet connectivity may not be available.&#x20;

## Offline registration demo

{% embed url="<https://www.youtube.com/watch?v=0jjkq4SoONM>" %}


# Self Service Portal

## Introduction

OpenG2P offers the on-demand approach via the Self Service Portal where a person logins via his/her ID and then applies for a program. In self-service mode, typically, OTP would be used for login. In assisted mode, the registering officer may have biometric devices connected to his/her machine, and the registrant can perform biometric authentication in an online manner.&#x20;

Online registration assumes that an ID verification service is available to connect via APIs and perform verification of the identity of a person. In the case of MOSIP, for e.g, the verification can be done using the [e-Signet](https://docs.mosip.io/1.2.0/integrations/e-signet) solution.

OpenG2P offers a *reference implementation* of a person facing Self Service Portal that lets a person log in to the portal using a national ID or other IDs, and perform the following functions:

* View enrolled programs
* View all the demographic information submitted across programs
* Update demographic information
* Apply for a new program
* View a list of all programs offered by the government/ministry/department.

OpenG2P offers a reference implementation of such a self-service portal.

## OpenID Connect integration

Users can log in via any OpenID Connect (OIDC) Auth provider. Any ID system that implements ODIC specification can be integrated with Self Service Portal for user login.

### Login using MOSIP ID

The Self Service Portal integrates with [e-Signet](https://docs.esignet.io/) to provide user login via MOSIP ID.

<figure><img src="/files/HreSNmRD1xETz3mPvy0R" alt=""><figcaption></figcaption></figure>

## Registration demo

{% embed url="<https://www.youtube.com/watch?v=DZweP3qKkn8>" %}


# API Interface


# ID Verification

## Introduction&#x20;

At the backend, the ID provided (functional or foundational) during registration is verified by submitting the demographic details and ID number by calling APIs of the corresponding ID system. The response from the ID system could be a *yes/no* response with optional data like ID token and KYC details.

## Verification of MOSIP ID

##


# Registry

## Introduction

OpenG2P registry is a single repository containing details of the registrants. The registry uses [PostgreSQL](https://www.postgresql.org/) for maintaining the information in a single DB table.

The purpose of the registry is to provide a single source of truth to the program administrators and managers. Program administrators can grant access to other program participants to act on this information.

## Identification of records

Identification of records in the registry is done with configured [ID types](#id-types). ID can be foundational like  MOSIP ID or functional like a voter's card, tax number, driving license, etc.&#x20;

## Individual and groups

Individual registrant information is entered in a single row. Whereas group details are stored in multiple rows in the form of relationships with the head or representative of the group.&#x20;

## Multiple entries

OpenG2P platform supports multiple entries for a registrant in the registry. The intent is to keep all the entries for a registrant and deduplicate later at the program level if required. Multiple entries allow program administrators the flexibility to build a registry without bothering about duplicate entries, especially during a crisis situation such as a flood, earthquake, tsunami, etc. and work on deduplication later using the [Deduplication Manager](/1.0.0/beneficiary-management/deduplication).&#x20;

## Privacy and security

A registry contains an individual's Personally Identifiable Information (PII) along with very rich demographic data. It is critical that this data is secure and PII is not shared in human-readable form or passed on to other systems without the individual's consent. OpenG2P offers secure and private registries to address this concern.

#### Security

Data at rest is encrypted using strong cryptographic techniques. The data is decrypted in memory while processing the record such that no trace of the unencrypted data is stored anywhere in the system.

#### Privacy

Data is anonymised while being displayed in human-readable form (for example, UI screen). Similarly, any query results from the registry are anonymised such that this information cannot be used to specifically target an individual.

## **Custom registrant information**

More often than not, program administrators require additional information about the registrants. However, each row in the database can have only a fixed number of fields. To provide customization, the OpenG2P registry captures the most commonly used fields such as name, age, gender, address, identity, etc. as a fixed number of individual fields. Any additional information is captured as key-value pairs held together in a blob.&#x20;

{% hint style="info" %}

### <mark style="color:purple;">Next generation registry</mark>

In the roadmap of OpenG2P, an enhanced secure registry with the following features is planned.&#x20;

1. Tokenised registry
2. Schema base fields
3. REST APIs interface
4. Verification with an ID system
5. Deduplicated entries
6. CRUD operations
7. Complex queries
8. Anonymous profile
9. Data encrypted at rest
10. [Verifiable credentials](/1.0.0/beneficiary-management/verifiable-credentials)
11. Evidence
12. Attestation
    {% endhint %}

## Developer References

[**API**](/1.0.0/api)

[**Code**](/1.0.0/guides/developer-guides)

## Guides

## FAQs


# Program Management

## Introduction

The Program Management module offers a rich set of functions to define various beneficiary programs (schemes), enrol beneficiaries based on eligibility, calculate entitlements and disburse benefits to the beneficiaries.

## Program definition

## Program states

* Created
* Ended
* Reactivated

## Target types

A program may be targeted to an individual or a group. A group may be a household, family or any other group to which the program is targeted.&#x20;


# Eligibility Assessment

## Introduction

A given program will have certain criteria to consider individuals eligible for that program. Assuming that eligibility can be expressed unambiguously based on an individual's demographic data, a program manager can easily run the criteria on the registry to create a beneficiary list using domain filters and eligibility plugins.

## Eligibility Manager

In OpenG2P, Eligibility Manager is a separate software module where the eligibility of a program is configured. If custom plugins are written, they are added to the Eligibility Manager.

Note that one eligibility manager can be associated with only one program. Each program should have its own eligibility manager created and configured.

## Domain filters

## Custom eligibility plugins

Example: Proxy Means Test


# Enrolment

## Introduction

Enrolment is the process of creating a beneficiary list of individuals or groups by querying the registry and applying eligibility criteria. OpenG2P provides convenient filters and plugins to make the entire process frictionless, convenient and time-saving.&#x20;

## Eligibility definition

Program eligibility could be defined as simple filters on the data collected for individuals (residing in the registry) or could be more sophisticated like [Proxy Means Test.](https://olc.worldbank.org/sites/default/files/1.pdf) Default filters and plugins are provided that would meet most of the eligibility definitions. For complex eligibility criteria, custom plugins can be written and added to the [Eligibility Manager](/1.0.0/beneficiary-management/eligibility#eligibility-manager).&#x20;

## Program assignment

## Program enrolment

### Demo

{% embed url="<https://www.youtube.com/watch?v=5NOfSTehmtU>" %}


# Deduplication

## Introduction

Deduplication refers to the process of removing duplicate entries in the registry, thus avoiding double-dipping, and merging all the demographic fields associated with an individual or a group into a single record.&#x20;

## Deduplication of individuals

Individuals are deduplicated by any of the below methods or a combination of these:

### Unique foundational ID

If a country has issued unique foundational IDs (like [MOSIP](https://mosip.io)) then deduplication is trivial -- there is only one record associated with an ID. For privacy, the foundational ID itself is not stored in the registry. Instead, a ['token'](https://docs.mosip.io/1.2.0/id-lifecycle-management/identifiers#token-id) or [virtual ID](https://docs.mosip.io/1.2.0/id-lifecycle-management/identifiers#vid) associated with the ID is stored.

### Functional IDs

If functional IDs like driver's license, tax number, student ID etc. are accepted while registration, then deduplication across IDs is somewhat challenging if a link between these is not already established and available to the OpenG2P system. In this case, heuristics are applied to demographic data to detect potential duplicates.

### No ID

In case registrants were onboarded without an ID, the deduplication is performed using heuristics on demographic data.

{% hint style="success" %}
OpenG2P is guided by the principle of **inclusion.** The system does not prevent registrations of persons who do not have an ID. This is especially applicable during emergency relief like floods, war, and other calamities.
{% endhint %}

## Deduplication of groups

Deduplication of groups refers to removing duplicate groups within a type of group like a family, or household. The deduplication method is context-dependent and is configured via rules. For example, if the same family has registered itself twice, it will be flagged as a duplicate. However, there are more complex scenarios - say, an individual appears in two different households while other members are different. Such cases will be flagged based on the configured rules.&#x20;

## Manual adjudication

Resolution of duplicates is generally done via a manual adjudication process, where an authority is visually able to inspect the data and reason for duplication. The authority can then decide whether the case is a duplicate or not based on the process set by the country/department/ministry.


# Disbursement Cycles

## Introduction

A program may have disbursement done in multiple time cycles with start and end dates for each cycle. Such cycles may be defined and triggered as per the schedule defined in each cycle.

## Cycles

<figure><img src="https://lh6.googleusercontent.com/_U-WEqXDiVCKlcb6E-4g8DGpYvDBNT0JWym9-8tPXUlQjtRcLwgLfaIhLgd2rE5-U2F7zClRfw3SMrsQ7Bs6kKfjP1ESDPsDIinHzIdRroVHRmNp8k05zKUeiUltcndPVO-QZApMPemdPog=s2048" alt=""><figcaption><p>Cycles defined for disbursement</p></figcaption></figure>

<figure><img src="https://lh5.googleusercontent.com/C76Zt0_MkMXaJabsTBYvv_RlpzwOgzbOg1UBsJSMeN-ER9_RFMQrdHK_kBi7wRJoZax4EGDOkEg2MDZrExKumBjcS5eOGTUG3fIkvYG945beQ2iyy50zDzYKyfYmWBHuBI51MdFjUa2wTnc=s2048" alt=""><figcaption><p>Cycle is approved</p></figcaption></figure>


# Entitlement

## Introduction

Entitlement is the quantity of benefit that a beneficiary is entitled to receive. For cash transfers, this is money that a beneficiary will receive via either direct bank transfer, mobile wallet, cash at the counter, vouchers or other disbursement mechanisms. Entitlement is defined for each [cycle](/1.0.0/beneficiary-management/disbursement-cycles).

## Entitlement Manager

## Approval process

<figure><img src="https://lh4.googleusercontent.com/Vbs5pMclvYLGON4eqOP2K0A9nkIUfsJz19myeTUM6WEqncf7lqros4YysgdicziYofqMEnGqmvRcbSnd9xGINkSwu2m8KPLNwIEFlSG6Y80A7i9_WGE9v4diA6iPM7sMSBqDlANvKJzrmlk=s2048" alt=""><figcaption><p>Entitlement to beneficiaries approved for a given cycle</p></figcaption></figure>


# Verifiable Credentials


# Payment Management

## Introduction

The Payments module consists of several functions to efficiently execute cash transfers to the beneficiaries and report the status of payments. Out of the box, OpenG2P offers payment connectors for [Mojaloop](https://mojaloop.io/) and [GSMA Mobile Money](https://www.gsma.com/mobilefordevelopment/mobile-money/) with flexibility to create custom connectors specific to the payment rails of a country.

Payments are generally executed in [cycles](/1.0.0/eligibility-and-enrolment/payment-cycles) and [batches](/1.0.0/eligibility-and-enrolment/payment-batches).

## Payments demo

{% embed url="<https://www.youtube.com/watch?v=O_CyoNZ2Mig>" %}


# Payment Cycles

## Introduction

In a given program, disbursement to beneficiaries is done in cycles. The entire entitlement to a beneficiary may be split into cycles for reasons of availability of funds, certain conditions that the beneficiary has to meet or other factors. Further, the beneficiary list may also undergo a change in different cycles based on updated eligibility criteria.&#x20;

## Cycle definition

## Beneficiary list update

## Splitting a beneficiary list across cycles

A beneficiary list may be split across cycles such that disbursement to a subset of the list is done in one cycle while for the rest disbursement is done in the next cycle.\*\*

{% hint style="info" %}
\*\* This feature will be available in version 1.2.x of OpenG2P.
{% endhint %}

##

###


# Payment Batches

## Introduction

In each [payment cycle](/1.0.0/eligibility-and-enrolment/payment-cycles), the payment transactions are done in batches. There could be several reasons for batching the payments. The transaction limits may be imposed by payment switch, [DFSP](broken://pages/rstNncdgT5nbsMvqIZ9O#dfsp) or any other entity in the payments chain.&#x20;

## Batch statistics

## Batch completion status

###


# Payment Manager

## Introduction

Payment Manager is an interface to connect a downstream payment system, like Payment Hub. Multiple Payment Managers may be configured to connect to different systems. Each configuration is specific to the payment system.

## Functionality

The Payment Manager creates batches and payment objects.&#x20;


# Payment Types


# In Account


# Voucher


# Cash


# In Kind


# Payment Rails

## Introduction

Digital payments infrastructure (DPI) could vary from country to country. It is therefore necessary that social benefit delivery systems have the ability to connect to the prevailing DPI and perform G2P payments efficiently. OpenG2P platform provides flexibility to connect to a payment system by writing custom connectors. By default, the platform offers interoperability with the following:

* [Mifos Payment Hub](https://payments.mifos.org/)
* [Mojaloop Payment Switch](https://payments.mifos.org/)
* [GSMA Mobile Money APIs](https://www.gsma.com/mobilefordevelopment/mobile-money/mobile-money-api/)

## FAQ

<details>

<summary>How do I create a custom connector?</summary>

Refer to the guide [here](broken://pages/67BccIplucCzICVAXTXO).

</details>


# Accounting


# Accounting

## Introduction

### Fund Management

### Entitlement

### Payments

### Payment Batches

### Program Fund Report

### Accounting Journals


# Reconciliation


# Reports


# Notifications

## Introduction

Notifications to beneficiaries and administrators are a must-have, especially when there are multiple stages of a delivery chain, usually with long time intervals between various stages. The beneficiaries must be informed about their enrolment status, entitlements, disbursements, exit etc. Multiple methods of notifications may be employed like postal and courier service, SMS, email, and messaging apps.&#x20;

OpenG2P provides in-built support for email and SMS with simple configuration changes. The notifications are triggered at certain default points in the delivery chain, however, depending on the needs of a specific implementation more trigger points may be added.


# Monitoring and Reporting

## Introduction

Monitoring the status of programs and registries is vital for program administrators. OpenG2P integrates a [reporting framework](https://github.com/mosip/reporting) that lets users create dashboards of their choice to visualise data. The framework uses open source technology components to create a pipeline of data flowing from the databases to visualisation tools.  A sample dashboard is given below:

<figure><img src="/files/NHuwmdtC7fYzeT6ABi9a" alt=""><figcaption></figcaption></figure>

## Reporting infra

<figure><img src="/files/QTQ3fOcTW5wRM7hVyk11" alt=""><figcaption></figcaption></figure>

Details of this infrastructure may be found [here](https://github.com/mosip/reporting).


# Workflows


# Cash grant scenario

A typical flow of enrolling a beneficiary by collecting data on the field by an agent, in offline mode, is illustrated below.

<figure><img src="/files/h0KvDwdCx6vFIFI6w35q" alt=""><figcaption></figcaption></figure>


# On-Demand Assistance

## Introduction

On-demand assistance is especially useful for scenarios like urgent surgeries, treatments, and other crises. However, to prevent instances of fraud, it is imperative to do a thorough assessment of beneficiary entitlement. This section details one reference implementation using multiple stages of approvals.

## Process

1. The beneficiary logs into [Self Service Portal](/1.0.0/secure-registry/registration-methods/self-service-portal) and provides details of assistance such as the type and cost of treatment along with the name, address, gender, age, occupation, and family information.
2. The assistance application is reviewed and assessed in multiple stages by the officers designated by the program administrator/manager. At each stage, the designated officer will either approve/reject the application with a valid reason. If the application is rejected at any one of the stages, the approval process stops.
3. After all the designated officers approve the application, the final approving officer will also issue an entitlement voucher. The entitlement voucher has a QR code that can be scanned to view beneficiary entitlement and prove the authenticity of the entitlement voucher.
4. The beneficiary takes the entitlement voucher to the service provider. The service provider scans the entitlement voucher. If the QR scan is valid, the service provider assists the beneficiary.

## Reference scenario

This example describes on-demand assistance with multi-stage approval.&#x20;

<div><figure><img src="https://github.com/smita-g2p/openg2p-documentation/raw/1.0.0/.gitbook/assets/on-demand-assistance-swimlane.png" alt=""><figcaption></figcaption></figure> <figure><img src="https://github.com/smita-g2p/openg2p-documentation/raw/2201c02a187365e8c6de1f30d61d863ca3329068/.gitbook/assets/on-demand-assistance.png" alt=""><figcaption></figcaption></figure></div>

### Customizations

* The program manager/administrator can custom-assign an assessment officer for each stage.&#x20;
* Though this example shows three stages, the number of stages can be customized.&#x20;
* The entitlement voucher can be communicated digitally or printed on paper.&#x20;


# Integrations


# Mojaloop Integration

## Introduction <a href="#introduction" id="introduction"></a>

This page describes the integration of OpenG2P with the [Mojaloop](https://mojaloop.io/) switch enabling cash transfer from one bank (treasury bank, for instance) to an individual's bank account. The connection to Mojaloop is achieved via an intermediate interoperability layer like the [Payment Hub](https://payments.mifos.org/) of Mifos.&#x20;

## Functional architecture

Below is the reference architecture of disbursements triggered from OpenG2P resulting in cash transfers.

<figure><img src="/files/qNhNRwv1aR4EmJFeO9eu" alt=""><figcaption><p>OpenG2P Payments Functional Architecture</p></figcaption></figure>

## Payment process

The beneficiary list is created on OpenG2P. After creating payment cycles and entitlements, payment batches are created for each cycle. A batch payment is triggered via the [Payment Manager](/1.0.0/eligibility-and-enrolment/payment-manager). This batch is received by the Payment Hub (PH) and payments are orchestrated either in bulk or individually. The Payment Hub connects to the Mojaloop interface of the Digital Financial Service Provider (DSFP). DFSP1 takes the transaction forward with Mojaloop Switch.&#x20;

Reconciliation at the OpenG2P end is done via status API calls to Payment Hub which is responsible for gathering payment status information of all transactions from DFSPs and Switch.

In the current integration, the account id of the payee is available in the OpenG2P registry and passed on to Payment Hub (hence propagated to Mojaloop). The account id of the payer is configured in the[ Payment Manager](/1.0.0/eligibility-and-enrolment/payment-manager).&#x20;

{% hint style="info" %}
If [Account Mapper](https://g2pconnect.global/) is available as part of Digital Public Infrastructure, then the account id need not be stored in the OpenG2P registry.
{% endhint %}

## Payment Hub <a href="#proof-of-concept-implementation-demo-1" id="proof-of-concept-implementation-demo-1"></a>

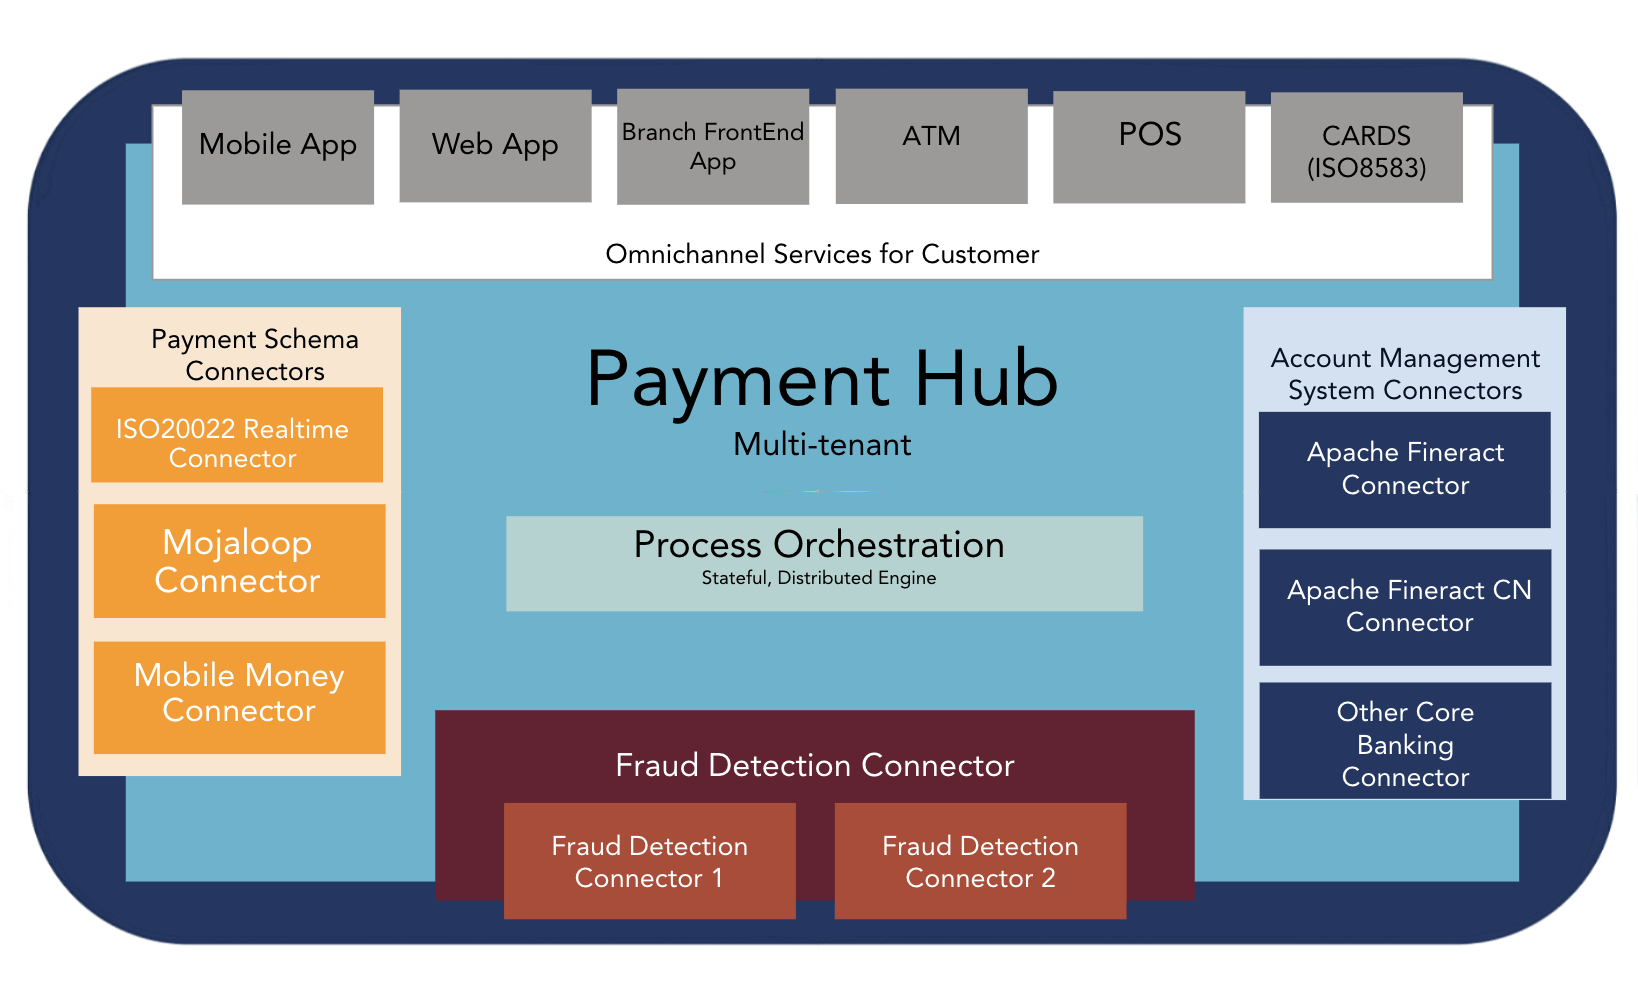
The payment architecture may vary from country to country. An interoperability layer like Payment Hub shields the downstream variations by offering a uniform payments API interface such that systems like OpenG2P do not have to modify the payments code, thus enabling interoperability with any payment system. Of course, customisation needs to be done on the Payment Hub, where a specific Payment Connector needs to be created specifically for the payment systems interface.&#x20;

<figure><img src="https://payments.mifos.org/wp-content/uploads/sites/20/2022/12/Screenshot-2022-12-27-at-10541-PM-transformed.png" alt=""><figcaption><p>Payment Hub</p></figcaption></figure>

Payment Hub connects to Mojaloop via the Mojaloop Connector.&#x20;

{% hint style="info" %}
As part of the roadmap, OpenG2P is working towards supporting payments interfaces being defined as part of the [G2P Connect](https://g2pconnect.global/) initiative.&#x20;
{% endhint %}

## Payments demo <a href="#proof-of-concept-implementation-demo-1" id="proof-of-concept-implementation-demo-1"></a>

{% embed url="<https://www.youtube.com/watch?v=O_CyoNZ2Mig>" %}

## Source code

The source code for OpenG2P - Payment Hub integration can be found [here](https://github.com/OpenG2P/openg2p-program/tree/15.0-develop/g2p_payment_phee).


# MOSIP Integration

## Introduction

OpenG2P integrates with MOSIP to verify the UIN/VIDs provided by individuals as part of the registration process. As a result of the verification, OpenG2P receives a unique token against an individual's UIN/VID along with KYC data. This data is stored in the registry.

There are two ways to obtain the MOSIP tokens:

1. For new registrations that are conducted via ODK form, The MTS Connector is configured to pull data directly from ODK Central and return MOSIP tokens. See [ODK MTS Connector](/1.0.0/integrations/integration-with-mosip/mts-connector).
2. For already existing records in the registry, the [Registry MTS Connector](/1.0.0/integrations/integration-with-mosip/registry-mts-connector) is used to trigger a connection with MTS and in turn receive MOSIP tokens for all the records requested.

##

##


# ODK MTS Connector

## Overview <a href="#overview" id="overview"></a>

ODK MTS Connector is an OpenG2P Odoo addon that fetches tokenised data from the ODK Central by calling the [MOSIP Token Seeder](https://docs.mosip.io/1.2.0/interoperability/integrations/mosip-token-seeder) (MTS) and stores it in the registry.

## Features <a href="#features-of-mts-c" id="features-of-mts-c"></a>

* Uses callback delivery type of MTS
* Completely asynchronous execution
* OpenG2P can schedule a daily job to fetch the delta for the day
* Manual import feature (TBD)

<figure><img src="/files/OYbnoQZNVXBD1su9OF2X" alt=""><figcaption></figcaption></figure>

## Configuration <a href="#input" id="input"></a>

<table><thead><tr><th>Property</th><th width="498">Description</th></tr></thead><tbody><tr><td><code>Name</code></td><td>A string to identify the connector</td></tr><tr><td><code>URL to reach MTS</code></td><td>URL for MTS API</td></tr><tr><td><code>MTS Input type</code></td><td>MTS-C connects over "<em>ODK</em>" which is the first option in this selection. OMC option could be proceeded by selecting <em>OpenG2P Registry</em>.</td></tr><tr><td><code>Mapping</code></td><td>MTS Field mapping as required by the API. Refer to <a href="https://docs.mosip.io/1.2.0/integrations/mosip-token-seeder">MTS Documentation</a>. The format of Mapping would be JSON.</td></tr><tr><td><code>Output Type</code></td><td>MTS-C only supports JSON output type of MTS.</td></tr><tr><td><code>Output Format</code></td><td>Output format is a <a href="https://stedolan.github.io/jq/">JQ</a>string which will be used by MTS to format its output to suite the caller's requirement.</td></tr><tr><td><code>Delivery Type</code></td><td>Currently supporting only "Callback". Callback feature can be used to make MTS do a submission of results onto an API within Odoo. The output formatting will help in making the desired input for the API.</td></tr><tr><td><code>Job Type</code></td><td>MTS-C provides both recurring and one time execution. Recurring can be configured to do continuous pull from the ODK over MTS.</td></tr><tr><td><code>Interval in minutes</code></td><td>Interval at which the MTS-C job runs.</td></tr><tr><td><code>MOSIP Language</code></td><td>MOSIP language setup. The default is "<em>eng</em>".</td></tr><tr><td><code>ODK Base URL</code></td><td>Base URL or the complete domain address for the ODK central installation</td></tr><tr><td><code>ODK Odata URL</code></td><td>OData service (.svc) URL for the ODK form to fetch the submissions.</td></tr><tr><td><code>ODK User email</code></td><td>Email Id to authenticate MTS for accessing Odata URL</td></tr><tr><td><code>ODK User password</code></td><td>Password used to authenticate Odata URL</td></tr><tr><td><code>Callback URL</code></td><td>A URL endpoint which would be called upon successful processing at MTS</td></tr><tr><td><code>Callback HTTP Method</code></td><td>HTTP Method (POST/PUT/GET/PATCH) used while MTS makes the callback</td></tr><tr><td><code>Callback Timeout</code></td><td>Timeout awaited by the callback until acknowledged with a response.</td></tr><tr><td><code>Callback Auth Type</code></td><td>Type of authentication expected by callback URL. MTS-C currently support Odoo type which uses the session-based authentication implemented by Odoo.</td></tr><tr><td><code>Callback Auth Database</code></td><td>DB instance used by Odoo.</td></tr><tr><td><code>Callback auth username</code></td><td>Username to access callback API</td></tr></tbody></table>


# Registry MTS Connector

## Overview

Registry MTS Connector (RMC) is an Odoo addon that fetches [MOSIP Auth Token](https://docs.mosip.io/1.2.0/id-lifecycle-management/identifiers#token-id) against any record in the registry by calling [MOSIP Token Seeder](https://github.com/OpenG2P/openg2p-documentation/blob/1.0.0/integrations/integration-with-mosip/broken-reference/README.md) (MTS) and stores the same in the registry.

## Features

* Generates MOSIP token against the OpenG2P registry by calling [MTS](https://github.com/OpenG2P/openg2p-documentation/blob/1.0.0/integrations/integration-with-mosip/broken-reference/README.md).
* Uses `callback` delivery type of MTS
* Completely asynchronous execution
* OpenG2P can schedule a daily job to fetch the delta for the day
* A manual import feature will also be provided
* Removes VID if MOSIP Auth Token is generated

## Configuration

| Property                       | Configuration                                                                                                                                                                                                                                            |
| ------------------------------ | -------------------------------------------------------------------------------------------------------------------------------------------------------------------------------------------------------------------------------------------------------- |
| `Name`                         | A string to identify the connector                                                                                                                                                                                                                       |
| `URL to reach MTS`             | URL for MTS API                                                                                                                                                                                                                                          |
| `MTS Input type`               | OMC option could be proceeded by selecting *OpenG2P Registry*.                                                                                                                                                                                           |
| `Mapping`                      | MTS Field mapping as required by the API. Please refer to MTS Documentation. Format of Mapping would be JSON.                                                                                                                                            |
| `Output Type`                  | MTS-C only supports JSON output type of MTS.                                                                                                                                                                                                             |
| `Output Format`                | Output format is a [JQ ](https://stedolan.github.io/jq/)string which will be used by MTS to format its output to suite the caller's requirement.                                                                                                         |
| `Delivery Type`                | Currently supporting only "Callback". Callback feature can be used to make MTS do a submission of results onto an API within Odoo. The output formatting will help in making the desired input for the api.                                              |
| `Job Type`                     | MTS-C provide both recurring and one time execution. Recurring can be configured to do continuous pull from the ODK over MTS.                                                                                                                            |
| `MOSIP Language`               | Mosip language setup. Default is *eng*.                                                                                                                                                                                                                  |
| `Interval in minutes`          | Interval at which the MTS-C job runs.                                                                                                                                                                                                                    |
| `Filters to apply to Registry` | A [domain filter](https://odootricks.tips/about/building-blocks/domain-in-odoo/) can be used to identify the records for tokenisation. For. eg. Only records which have VID associated with it and are not tokenised need to be picked for tokenisation. |
| `List of fields to be used`    | List of fields which will be supplied as auth data. This field list may be a superset of fields required for auth as it may contain data required by the callback API. This list should be a valid JSON string array.                                    |
| `Callback URL`                 | A URL endpoint which would be called upon successful processing at MTS                                                                                                                                                                                   |
| `Callback HTTP Method`         | HTTP Method (POST/PUT/GET/PATCH) used while MTS makes the callback                                                                                                                                                                                       |
| `Callback Timeout`             | Timeout awaited by the callback until acknowledged with a response.                                                                                                                                                                                      |
| `Callback Auth Type`           | Type of authentication expected by callback URL. MTS-C currently support Odoo type which uses the session-based authentication implemented by Odoo.                                                                                                      |
| `Callback Auth Database`       | DB instance used by Odoo.                                                                                                                                                                                                                                |
| `Callback auth username`       | Username to access callback API                                                                                                                                                                                                                          |
| `Callback auth password`       | Password to access callback API                                                                                                                                                                                                                          |


# Integration with e-Signet

## Introduction

OpenG2P can use [e-Signet](https://docs.esignet.io/) for authentication. e-Signet provides an [OIDC](https://openid.net/connect/) interface for authentication while connecting to the MOSIP's IDA services on the backend.

<figure><img src="https://1786418539-files.gitbook.io/~/files/v0/b/gitbook-x-prod.appspot.com/o/spaces%2FylzvZHp30DQ3rNCClELV%2Fuploads%2FGn34BnmmusJbJFjSYOAk%2FIdP%20Diagrams-Page-3.png?alt=media&#x26;token=21de4b84-f1d2-4254-a30d-9ca8a40534c8" alt=""><figcaption></figcaption></figure>

Here, OpenG2P is a Relying Party and the Authentication System is MOSIP. Learn [more](https://docs.esignet.io/integration-guides/authentication-system-integration).

## Configure OpenG2P for e-Signet

Refer to the guide [Integrate MOSIP e-Signet](/1.0.0/guides/user-guides/integrate-mosip-e-signet).

##


# API

## User authentication

{% openapi src="/files/8rzDooEvw0k5kXJuyzVl" path="/login" method="post" %}
[auth.json](https://1531528365-files.gitbook.io/~/files/v0/b/gitbook-x-prod.appspot.com/o/spaces%2FxkdlCOLME2p03rS8nG8u%2Fuploads%2FL3DX1CMZUEFGWiPecdVN%2Fauth.json?alt=media\&token=5dd2c76a-20b3-4f33-b198-6eb6036c0c0b)
{% endopenapi %}

{% openapi src="/files/8rzDooEvw0k5kXJuyzVl" path="/logout" method="post" %}
[auth.json](https://1531528365-files.gitbook.io/~/files/v0/b/gitbook-x-prod.appspot.com/o/spaces%2FxkdlCOLME2p03rS8nG8u%2Fuploads%2FL3DX1CMZUEFGWiPecdVN%2Fauth.json?alt=media\&token=5dd2c76a-20b3-4f33-b198-6eb6036c0c0b)
{% endopenapi %}

## Individual Registration

{% openapi src="/files/9uRpVhygGN7EBWjx1ukq" path="/" method="get" %}
[individual.json](https://1531528365-files.gitbook.io/~/files/v0/b/gitbook-x-prod.appspot.com/o/spaces%2FxkdlCOLME2p03rS8nG8u%2Fuploads%2FSBwiNZzUDgKu341AgZbW%2Findividual.json?alt=media\&token=06158178-40e4-4624-a4d1-6995a027aa81)
{% endopenapi %}

{% openapi src="/files/9uRpVhygGN7EBWjx1ukq" path="/" method="post" %}
[individual.json](https://1531528365-files.gitbook.io/~/files/v0/b/gitbook-x-prod.appspot.com/o/spaces%2FxkdlCOLME2p03rS8nG8u%2Fuploads%2FSBwiNZzUDgKu341AgZbW%2Findividual.json?alt=media\&token=06158178-40e4-4624-a4d1-6995a027aa81)
{% endopenapi %}

{% openapi src="/files/9uRpVhygGN7EBWjx1ukq" path="/{id}" method="get" %}
[individual.json](https://1531528365-files.gitbook.io/~/files/v0/b/gitbook-x-prod.appspot.com/o/spaces%2FxkdlCOLME2p03rS8nG8u%2Fuploads%2FSBwiNZzUDgKu341AgZbW%2Findividual.json?alt=media\&token=06158178-40e4-4624-a4d1-6995a027aa81)
{% endopenapi %}

{% openapi src="/files/9uRpVhygGN7EBWjx1ukq" path="/search" method="get" %}
[individual.json](https://1531528365-files.gitbook.io/~/files/v0/b/gitbook-x-prod.appspot.com/o/spaces%2FxkdlCOLME2p03rS8nG8u%2Fuploads%2FSBwiNZzUDgKu341AgZbW%2Findividual.json?alt=media\&token=06158178-40e4-4624-a4d1-6995a027aa81)
{% endopenapi %}

{% openapi src="/files/9uRpVhygGN7EBWjx1ukq" path="/updateIdentification" method="patch" %}
[individual.json](https://1531528365-files.gitbook.io/~/files/v0/b/gitbook-x-prod.appspot.com/o/spaces%2FxkdlCOLME2p03rS8nG8u%2Fuploads%2FSBwiNZzUDgKu341AgZbW%2Findividual.json?alt=media\&token=06158178-40e4-4624-a4d1-6995a027aa81)
{% endopenapi %}

## Group Registration

{% openapi src="/files/FHrJBtihOKupiSbpG40P" path="/" method="get" %}
[group.json](https://1531528365-files.gitbook.io/~/files/v0/b/gitbook-x-prod.appspot.com/o/spaces%2FxkdlCOLME2p03rS8nG8u%2Fuploads%2Ff15kIEbiv5dPLgD9rn4M%2Fgroup.json?alt=media\&token=53af09f8-4562-43a9-984a-45b932465098)
{% endopenapi %}

{% openapi src="/files/FHrJBtihOKupiSbpG40P" path="/" method="post" %}
[group.json](https://1531528365-files.gitbook.io/~/files/v0/b/gitbook-x-prod.appspot.com/o/spaces%2FxkdlCOLME2p03rS8nG8u%2Fuploads%2Ff15kIEbiv5dPLgD9rn4M%2Fgroup.json?alt=media\&token=53af09f8-4562-43a9-984a-45b932465098)
{% endopenapi %}

{% openapi src="/files/FHrJBtihOKupiSbpG40P" path="/{id}" method="get" %}
[group.json](https://1531528365-files.gitbook.io/~/files/v0/b/gitbook-x-prod.appspot.com/o/spaces%2FxkdlCOLME2p03rS8nG8u%2Fuploads%2Ff15kIEbiv5dPLgD9rn4M%2Fgroup.json?alt=media\&token=53af09f8-4562-43a9-984a-45b932465098)
{% endopenapi %}

{% openapi src="/files/FHrJBtihOKupiSbpG40P" path="/search" method="get" %}
[group.json](https://1531528365-files.gitbook.io/~/files/v0/b/gitbook-x-prod.appspot.com/o/spaces%2FxkdlCOLME2p03rS8nG8u%2Fuploads%2Ff15kIEbiv5dPLgD9rn4M%2Fgroup.json?alt=media\&token=53af09f8-4562-43a9-984a-45b932465098)
{% endopenapi %}


# Testing

## Test cases and verification

The Excel sheet below lists test cases and their verification status for different versions of software. This is a live sheet, and will have the latest status of verification.

{% embed url="<https://docs.google.com/spreadsheets/d/1KIK0CbDo_99U1vAW9QqOErWNm0ZkGz_XabmXu0CvrMI/edit?usp=sharing>" %}


# Community


# Contributing

## Introduction

OpenG2P is a collaborative effort of several contributors. We welcome contributions to the OpenG2P Project.

## Issues

Raise bugs/issues/tasks on GitHub Issues of individual repositories.

All the issues and tasks are tracked using [Jira](https://openg2p.atlassian.net).

## Code contributions

To contribute code to the OpenG2P project, follow the steps given below:

1. Create an issue on Github related to your task.
2. Fork the corresponding repository.
3. Commit your changes in your forked repo. Make sure the issue id of GitHub is mentioned in square braces, e.g. `[#6] Minor changes to fix the bug.`
4. Raise a Pull Request (PR) on the appropriate branch. In general, it is safe to send PRs to `develop` branch of a repo.
5. The PRs shall be reviewed by the technical team and merged after approval.

## Coding conventions

* For Odoo modules, follow the [Odoo Coding Guidelines.](https://www.odoo.com/documentation/15.0/contributing/development/coding_guidelines.html)
* For non-Odoo Python code, follow [PEP 8 – Style Guide for Python Code](https://peps.python.org/pep-0008/).

## Documentation contributions

The documentation of the project is available as `.md` files in the [Documentation repository](https://github.com/openg2p/openg2p-documentation). To highlight a correction or request for additional documentation, raise a GitHub Issue on the repository. To contribute to the documentation follow the steps given under [Code contributions](#code-contributions).

## Versioning of modules

For Odoo modules, follow the [Odoo Versioning](https://setuptools-odoo.readthedocs.io/en/latest/#versioning).  To indicate the maturity of a version (like alpha/beta etc.) use `development_status` field in the `__manifest__.py` file as described [here](https://github.com/OCA/odoo-community.org/blob/master/website/Contribution/oca_module_lifecycle_development_status.rst).

For Non-Odoo modules, follow [Semantic Versioning](https://semver.org/).

OpenG2P release will follow Semantic Versioning.  For GitHub branches and tags versions, refer to the sections below.

## Branching and tagging conventions

For Odoo module repositories, a prefix of Odoo version is added to the branch name, e.g. `15.0-1.0.0, 15.0-develop.`Within a branch, multiple Git tags may be created like `15.0-1.0.0-rc1`, `15.0-1.0.0-rc2` etc.&#x20;

For non-Odoo module repositories, you should find a `develop` branch in the repo where in-progress work may be checked-in.

For releases, a release branch is forked out of the `develop` branch and subsequently, release specific check-ins like bug fixes are made on this branch. For the final release, this branch is Git tagged, frozen (no further check-ins allowed) and merged into the `develop` branch. Thus, all the changes related to the release are available in `develop` for further development.  The recommended Github tagging convention for a final release is to have a prefix `v` or `release` before the version number. For example, `v15.0.1.0.0, release-15.0.1.0.0, v1.0.0, release-1.0.0`


# Code of Conduct

## Contributor Covenant Code of Conduct

### Preamble

OpenG2P was created to foster an open, innovative and inclusive community around open source & open standard. To clarify expected behaviour in our communities we have adopted the Contributor Covenant. This code of conduct has been adopted by many other open source communities and we feel it expresses our values well.

### Our Pledge

We as members, contributors, and leaders pledge to make participation in our community a harassment-free experience for everyone, regardless of age, body size, visible or invisible disability, ethnicity, sex characteristics, gender identity and expression, level of experience, education, socio-economic status, nationality, personal appearance, race, caste, color, religion, or sexual identity and orientation.

We pledge to act and interact in ways that contribute to an open, welcoming, diverse, inclusive, and healthy community.

### Our Standards

Examples of behavior that contributes to a positive environment for our community include:

* Demonstrating empathy and kindness toward other people
* Being respectful of differing opinions, viewpoints, and experiences
* Giving and gracefully accepting constructive feedback
* Accepting responsibility and apologizing to those affected by our mistakes, and learning from the experience
* Focusing on what is best not just for us as individuals, but for the overall community

Examples of unacceptable behavior include:

* The use of sexualized language or imagery, and sexual attention or advances of any kind
* Trolling, insulting or derogatory comments, and personal or political attacks
* Public or private harassment
* Publishing others' private information, such as a physical or email address, without their explicit permission
* Other conduct which could reasonably be considered inappropriate in a professional setting

### Enforcement Responsibilities

Community leaders are responsible for clarifying and enforcing our standards of acceptable behavior and will take appropriate and fair corrective action in response to any behavior that they deem inappropriate, threatening, offensive, or harmful.

Community leaders have the right and responsibility to remove, edit, or reject comments, commits, code, wiki edits, issues, and other contributions that are not aligned to this Code of Conduct, and will communicate reasons for moderation decisions when appropriate.

### Scope

This Code of Conduct applies within all community spaces, and also applies when an individual is officially representing the community in public spaces. Examples of representing our community include using an official e-mail address, posting via an official social media account, or acting as an appointed representative at an online or offline event.

### Enforcement

Instances of abusive, harassing, or otherwise unacceptable behavior may be reported to the community leaders responsible for enforcement at \[INSERT CONTACT METHOD]. All complaints will be reviewed and investigated promptly and fairly.

All community leaders are obligated to respect the privacy and security of the reporter of any incident.

### Enforcement Guidelines

Community leaders will follow these Community Impact Guidelines in determining the consequences for any action they deem in violation of this Code of Conduct:

#### 1. Correction

**Community Impact**: Use of inappropriate language or other behavior deemed unprofessional or unwelcome in the community.

**Consequence**: A private, written warning from community leaders, providing clarity around the nature of the violation and an explanation of why the behavior was inappropriate. A public apology may be requested.

#### 2. Warning

**Community Impact**: A violation through a single incident or series of actions.

**Consequence**: A warning with consequences for continued behavior. No interaction with the people involved, including unsolicited interaction with those enforcing the Code of Conduct, for a specified period of time. This includes avoiding interactions in community spaces as well as external channels like social media. Violating these terms may lead to a temporary or permanent ban.

#### 3. Temporary Ban

**Community Impact**: A serious violation of community standards, including sustained inappropriate behavior.

**Consequence**: A temporary ban from any sort of interaction or public communication with the community for a specified period of time. No public or private interaction with the people involved, including unsolicited interaction with those enforcing the Code of Conduct, is allowed during this period. Violating these terms may lead to a permanent ban.

#### 4. Permanent Ban

**Community Impact**: Demonstrating a pattern of violation of community standards, including sustained inappropriate behavior, harassment of an individual, or aggression toward or disparagement of classes of individuals.

**Consequence**: A permanent ban from any sort of public interaction within the community.

### Attribution

This Code of Conduct is adapted from the [Contributor Covenant version 2.1](https://www.contributor-covenant.org/version/2/1/code_of_conduct/).

Community Impact Guidelines were inspired by [Mozilla's code of conduct enforcement ladder](https://github.com/mozilla/diversity).

For answers to common questions about this code of conduct, see the [FAQ](https://www.contributor-covenant.org/faq). Translations are available [here](https://www.contributor-covenant.org/translations).


# License

## Source code

All [OpenG2P repositories](https://github.com/OpenG2P) containing source code are licensed under the terms of [Mozilla Public License 2.0](https://www.mozilla.org/en-US/MPL/2.0/).

All trademarks are the property of their respective holders. Other products and company names mentioned [herein](https://github.com/OpenG2P) may be their respective owners' trademarks and/or service marks.

## Documentation

This documentation work is licensed under a [Creative Commons Attribution 4.0 International License](https://creativecommons.org/licenses/by/4.0/).

<figure><img src="/files/L8bQqayA1MwK8vVmYe1m" alt=""><figcaption></figcaption></figure>


# How-To Guides


# Create Program

## Description&#x20;

The guide here provides steps to create a new program. A program is typically created by a Program Manager who can create and administer programs.

## Pre-requisites

The user must have a Program Manager role. See [Create User and Assign Role](/1.0.0/guides/user-guides/assign-roles-to-users) guide.

## Steps

1. Navigate to *Programs* using the menu bar.

<figure><img src="/files/gMb0sO9M97iLNI2bE0pt" alt=""><figcaption><p>Create a new program</p></figcaption></figure>

2. Click on the *Create Program* to reach the Program creation page.  Provide Program name, target type and currency. There are tabs for the configuration of various managers.
3. **Eligibility criteria:**

   <div align="center"><figure><img src="/files/MVTNrQHnVevtrBiKw0Nw" alt=""><figcaption><p>Configure eligibility criteria</p></figcaption></figure></div>
4. Us&#x65;*+Add filter* to set eligibility criteria using [Domain Filters](/1.0.0/beneficiary-management/eligibility#domain-filters). You may set multiple eligibility criteria.&#x20;
5. **Cycle Manager:**  Set parameters of [disbursement cycles](/1.0.0/beneficiary-management/disbursement-cycles).

   <figure><img src="/files/WxuO1gqVixfxnmMbXwLI" alt=""><figcaption></figcaption></figure>

   * *Auto-approve Entitlements:* To set entitlements via rules, without any manual approvals.
   * *Approver Group:* The group name of the user who has permission to approve cycles. See [Create User and Assign Role](/1.0.0/guides/user-guides/assign-roles-to-users).
   * *Recurrence:* The time period for the repetition of a cycle.
6. **Entitlement Manager:**  Set parameters for [entitlements](/1.0.0/beneficiary-management/entitlement).

   <figure><img src="/files/wUkRBQBNlMNGJwR5X5qk" alt=""><figcaption></figcaption></figure>

   * *Amount Per Cycle:* The amount disbursement of a group or individual per cycle.
   * *Amount Per Individual In Group:* Amount of disbursement per individual in a group when the program [target type](/1.0.0/beneficiary-management#target-types) is "group".
   * *Maximum number of individuals in a group:*  Maximum number of individuals who get disbursements per group (optional).
   * *Transfer Fee(%):* Fee incurred for disbursement as a percentage of disbursement (optional).
   * *Transfer Fee Amount:* Fee incurred for disbursement as an absolute amount (optional).
   * *Entitlement Validation Group:* The group name of the user who has permission to approve entitlements. See [Create User and Assign Role](/1.0.0/guides/user-guides/assign-roles-to-users).&#x20;
7. **Map Portal form:** Map a portal form to this program. [Create a portal form](https://app.gitbook.com/o/bnTr6Kp4z4CXR4QVIPSa/s/xkdlCOLME2p03rS8nG8u/~/changes/168/guides/user-guides/create-portal-form) before this mapping. &#x20;
8. Click the *Next* button to import the matching registrants to the creating program. In the pop-up window select *Yes*.

<figure><img src="/files/J2ngd1ogAOqgBEWSBgLT" alt=""><figcaption></figcaption></figure>

9. Once the program is created it will be listed under the program list view page.


# Configure Proxy Mean Test

## Description

The guide provides steps to enable and configure the proxy mean test.

## Pre-requisites

The user must have a Program Manager role.

## Steps

1. Navigate to *Programs* using the menu bar.

<figure><img src="/files/gMb0sO9M97iLNI2bE0pt" alt=""><figcaption></figcaption></figure>

2. Click on the program name for which configuration to be done.

<figure><img src="/files/go2XgnirkzeXcosItga9" alt=""><figcaption></figcaption></figure>

3. Navigate to the *PMT* *Configuration* section on Program detailed view page.

<figure><img src="/files/5yDomiGgkd7vE0l0YfwT" alt=""><figcaption></figcaption></figure>

4. Enable PMT and click on *Add a line* in the *PMT Parameters* field.

<figure><img src="/files/Va3CJNgLIJrt34f60uSv" alt=""><figcaption></figcaption></figure>

5. Select the field and provide its weightage.

<figure><img src="/files/m9o15fzGD3EoiUaJ79Bg" alt=""><figcaption></figcaption></figure>

{% hint style="info" %}
The above-mentioned selection fields are computed fields and can be added in the settings.
{% endhint %}

6. Click on the *Save & New* button to select a new field and provide its weightage or *Save & Close* button which will save the fields and their weightage to that program under configuration.

<figure><img src="/files/Oh2qhaK9ZEZmL2VN1xHb" alt=""><figcaption></figcaption></figure>

7. Click on the *Save* button.

## Steps to add computed fields

{% hint style="info" %}
Enable developer mode.

Settings --> Developer Tools --> 'Activate the developer mode'
{% endhint %}

1. Navigate to *Settings* using the menu bar.

<figure><img src="/files/yU4aZAOzRTUYk81VGLEs" alt=""><figcaption></figcaption></figure>

2. Click on *Technical* in the setting menu.&#x20;

<figure><img src="/files/XPwpJYNchXx1CquRzLf4" alt=""><figcaption></figcaption></figure>

3. Navigate to *Models* under *Database Structure* heading.

<figure><img src="/files/oZB8WOrBcw2JetQXay9E" alt=""><figcaption></figcaption></figure>

4. Search *Program Registrant Info* model in the search bar.

<figure><img src="/files/oQ4WSV25dU40EPP3mLCL" alt=""><figcaption></figcaption></figure>

5. Click on *g2p.program.registrant\_info* model.

<figure><img src="/files/9s0mFG0Ml2Z6tfIi1nFK" alt=""><figcaption></figcaption></figure>

6. Click on *add a line* in Fields section.

<figure><img src="/files/kvJ14uyvq65OQVCS5MI7" alt=""><figcaption></figcaption></figure>

6. Add field name, type, label, dependencies field and compute logic.&#x20;

<figure><img src="/files/G0fGmMlQUqP1Q4iadIr1" alt=""><figcaption></figcaption></figure>

8. Click on the *Save & New* button to select a new computed field or *Save & Close* button which will save the computed field in the model.

<figure><img src="/files/O4WvxqXFxpxOzbeYBXMH" alt=""><figcaption></figcaption></figure>

9. Click on the *Save* button.

{% hint style="info" %}
So, these computed fields will display in the selection field of PMT Configuration.
{% endhint %}


# Create User and Assign Role

## Description

The guide here provides steps to create a new user and assign a role. This process is typically done by the Administrator.

## Pre-requisites

The user should have an Administrator role.

## Steps

1. Navigate to *Settings* using the menu bar.

<figure><img src="/files/V1hw0dPNlfuFSlUgnLV6" alt=""><figcaption></figcaption></figure>

2. Click on *Users & Companies* and then select *Users* to reach user's list view page.

<figure><img src="/files/3WaVlGKKwTkLxfbs7gwz" alt=""><figcaption></figcaption></figure>

3. Click on the *Create* button to reach user creation page.

<figure><img src="/files/u9CG7QGfb7Ot2dJK3ouD" alt=""><figcaption></figcaption></figure>

4. *Email:* Provide a valid email Id. The invitation email will be sent to this Id.
5. Select the role for a user from the *OpenG2P module access* section.&#x20;

<figure><img src="/files/RRDPK3f1WDt8BkwnLrVP" alt=""><figcaption></figcaption></figure>

6. Once the user is saved it will be listed under the user list view page and the invitation mail will be triggered.

<figure><img src="/files/ftSIcRSHNTOkaF4iByZl" alt=""><figcaption></figcaption></figure>


# Create ODK Form

## Description

This guide provides steps to create a new ODK form for a program.

## Pre-requisites

* [ODK Central](https://docs.getodk.org/central-intro/) should be deployed and available.
* The user should have an Administrator role in ODK Central. See [Create User and Assign Role](/1.0.0/guides/user-guides/assign-roles-to-users) guide.

## Steps

1. Login to ODK Central.&#x20;
2. Click on the +*New* button to create a new project

<figure><img src="/files/dR06Eylgiefx1L60UlVd" alt=""><figcaption></figcaption></figure>

2. &#x20;Provide the project name same as the program name for which creating the form.

<figure><img src="/files/vZYo6BOovWbhSt6mcxCJ" alt=""><figcaption></figcaption></figure>

3. Once the project is created and listed on the ODK home page, click on the project name.
4. Click on the +*New* button on the project overview page to create a new form.

<figure><img src="/files/7ibzvEZxvtPj7hqUyClU" alt=""><figcaption></figcaption></figure>

5. Choose a file which has form values and upload it.

<figure><img src="/files/fMVff8PmrssuxVpc1YaB" alt=""><figcaption></figcaption></figure>

6. Once the form file is uploaded it will be in draft status. Click on *Publish* *Draft* to publish the form.

<figure><img src="/files/uMLmKOOKwymgu0xPZPhQ" alt=""><figcaption></figcaption></figure>

7. Once the draft is published it will be listed under the project overview.


# Create Portal Form

## Description

This guide provides steps to create a new portal form for a program. This form will show up on the Self-Service Portal when the user selects a program to apply.

## Pre-requisites

The user must have a Program Manager role. See [Create User and Assign Role](/1.0.0/guides/user-guides/assign-roles-to-users) guide.

## Steps

1. &#x20;Navigate to the *Website* using the menu bar.

<figure><img src="/files/QrFjnakBLULGr0J7upOQ" alt=""><figcaption></figcaption></figure>

2. Click on *Go to Website* to navigate to the website home page.

<figure><img src="/files/gRKg90Nu7sIJ3BvXFuGM" alt=""><figcaption></figcaption></figure>

3. Click on the + *New* button to create new form.

<figure><img src="/files/9L6hR5ikv5I4rpZShmdS" alt=""><figcaption></figcaption></figure>

4. Click on *Page* to create a form.

<figure><img src="/files/1CblGOknHG4xfLk8eJ3r" alt=""><figcaption></figcaption></figure>

5. Enter the page title and click on *Create* button under New Page pop-up window.

<figure><img src="/files/NzajzOEaGlnWagE44Gwo" alt=""><figcaption></figcaption></figure>

6. Drag and drop the *Form* in the *Dynamic Content* from the *BLOCKS* section.

<figure><img src="/files/nmZHkXOL7oTlyn5hn0f5" alt=""><figcaption></figcaption></figure>

7. Edit the form fields from the *STYLE* section.&#x20;

<figure><img src="/files/AbHCeI1jQNlm7EPaeX89" alt=""><figcaption></figcaption></figure>

8. Add more form fields using *+Field* from the *STYLE* section.
9. Save the form using the *Save* button.


# Provide Form Access to Field Agent

## Description

This guide will help to provide the form access to the field agent. which helps the agent to download the program form.

## Pre-requisites

The access provider should have the Administrator role in ODK Central.

## Steps

1. Login to ODK central with a user having an Administrator role.
2. Click on the program name in *Projects* on which the agent access is to be provided.

<figure><img src="/files/dR06Eylgiefx1L60UlVd" alt=""><figcaption></figcaption></figure>

3. Navigate to *App Users* below the program name.

<figure><img src="/files/BLX5MDaYLAAbZizY6L3y" alt=""><figcaption></figcaption></figure>

4. Click on the +*Create App User* button to add a field agent to the program.
5. Provide the name of the field agent on the popup window and click on *Create* button. Agent name will be listed under the App user list.

<figure><img src="/files/20Nh5qIujd7Qgm5hkaPY" alt=""><figcaption></figcaption></figure>

6. Navigate to *Form Access* and select the forms for which access is to be given. Click on the *Save* button.

<figure><img src="/files/QzPA0l1IkkDlIiphlOhe" alt=""><figcaption></figcaption></figure>


# Download Form on ODK Collect

## Description

This guide will help to download the program form on ODK Collect Application running on an Android tablet or phone.

## Pre-requisites

* The field agent should have ODK Collect Application installed.
* The field agent should have[ form access](https://app.gitbook.com/o/bnTr6Kp4z4CXR4QVIPSa/s/xkdlCOLME2p03rS8nG8u/~/changes/174/guides/user-guides/provide-form-access-to-field-agent).

## Steps

1. The Administrator logs into ODK Central and navigates to the *App Users* under the program name.

<figure><img src="/files/BLX5MDaYLAAbZizY6L3y" alt=""><figcaption></figcaption></figure>

2. Click on *See Code* to get the *Client Configuration QR* *code*.

<figure><img src="/files/w1g6du6vFeHfhXFv67wc" alt=""><figcaption></figcaption></figure>

3. Open the ODK Collect application in the field agent device.

<figure><img src="/files/58U7kAro4vMdyXyICibl" alt=""><figcaption></figcaption></figure>

4. Click on *Add Project* to scan the configuration QR code.

<figure><img src="/files/UqSqrkTjA4d4ror62LhF" alt=""><figcaption></figcaption></figure>

5. After scanning the *Client Configuration QR* *code* all the given access program forms will be downloaded to the field agent's device.

<figure><img src="/files/w1g6du6vFeHfhXFv67wc" alt=""><figcaption></figcaption></figure>

<figure><img src="/files/aW4AhaSqAkyczkXTXzZ9" alt=""><figcaption></figcaption></figure>


# Register Offline

## Description

This guide will provide the steps to register beneficiaries through an offline process.  [offline registration](/1.0.0/secure-registry/registration-methods/offline-registration) is done by the Field Agent.

## Pre-requisites

* The agent should have ODK collect and Smart Scanner Application Installed
* Agents should have form access.
* Agents should have downloaded the program form on his/her device.
* Beneficiaries should have their National ID card with them.
* ODK MTS Connector which is mapped to the form should be in Running status.

## Steps

1. Open the program form from the ODK Collect application.

<figure><img src="/files/aW4AhaSqAkyczkXTXzZ9" alt=""><figcaption></figcaption></figure>

2. Click on *Fill Blank Form* to fill in all form fields with beneficiary data.

<figure><img src="/files/CG76fag6X7YvtiqZcncm" alt=""><figcaption></figcaption></figure>

3. At some point, the form will have the *Launch* button. Click on the *Launch* button to scan the QR code on the National ID of the Beneficiary.

<figure><img src="/files/pgQmfI4MCqxNqXQ0rpoa" alt=""><figcaption></figcaption></figure>

4. Once the scanning is done beneficiary data will be auto-populated as per the form fields configuration.

<figure><img src="/files/Pb21oGz0V7jsN8WQde4Z" alt=""><figcaption></figcaption></figure>

5. After filling in all the mandatory fields click on the *Save and Submit* button.

* If the Field Agent is online, the submitted entries will be sent to ODK Central and will be listed under *View Sent Form* or else they will be saved in the Field Agents device in *Send Finalized Form Section.*

<figure><img src="/files/P9eMXjoxEW7aX1U4IwR8" alt=""><figcaption></figcaption></figure>


# Self Register Online

## Description

This guide helps beneficiaries to self-register through the beneficiary portal.

## Pre-requisites

Beneficiaries should have the MOSIP-issued national ID with them.

## Steps&#x20;

1. Go to the beneficiaries portal login page.

<figure><img src="/files/ltYYHbESuuePB14XUMvg" alt=""><figcaption></figcaption></figure>

2. Click on *Sign IN with MOSIP* to continue with a MOSIP-issued national ID.
3. Navigate to *Login with OTP* using *LOG IN HERE* and provide the VID/UIN.

<figure><img src="/files/5NaBl3h3KqBrMi0UZF4E" alt=""><figcaption></figcaption></figure>

4. After clicking *Get OTP,* OTP will be sent to the registered email and phone number.
5. Provide the OTP and click on *Verify* to proceed further.

<figure><img src="/files/AEBD2CGdi0AS85MLs6nM" alt=""><figcaption></figcaption></figure>

6. Provide consent and click on *Allow* which navigates to the beneficiary portal home page.

<figure><img src="/files/PitsUqYkIjOHLNa5JnTH" alt=""><figcaption></figcaption></figure>

7. Click on *View All Programs* to check out the available programs to apply for.

<figure><img src="/files/0iFATtsi3kRYB8T82CZ4" alt=""><figcaption></figcaption></figure>

8. Click on *Apply* to fill in the beneficiary details in the program form.

<figure><img src="/files/SZUpT1ZbtnRuziq7bUzN" alt=""><figcaption></figcaption></figure>

9. Once the form fields are filled click on Submit button for application submission.

<figure><img src="/files/ZxescKiawf4AkDSEfRqi" alt=""><figcaption></figcaption></figure>

10. Once the program form is submitted, the program will be added to the *My Programs* section with the *Submitted* status and the beneficiary will be registered to the program. also will be listed in the *OpenG2P Registry Individual* as well.

<figure><img src="/files/dyAgUp6xMPJNd8fFnWdo" alt=""><figcaption></figcaption></figure>

<figure><img src="/files/j87DzhD4GyoQyYZT39sM" alt=""><figcaption></figcaption></figure>


# Create MTS Connector

## Description

This guide provides the steps to create MTS Connectors.

There are two types of MTS Connectors differentiated based on input types

1. [ODK](https://app.gitbook.com/o/bnTr6Kp4z4CXR4QVIPSa/s/xkdlCOLME2p03rS8nG8u/~/changes/174/guides/user-guides/create-mts-connector/create-odk-mts-connector)
2. [OpenG2P Registry](https://app.gitbook.com/o/bnTr6Kp4z4CXR4QVIPSa/s/xkdlCOLME2p03rS8nG8u/~/changes/174/guides/user-guides/create-mts-connector/create-openg2p-registry-mts-connector.)

## Pre-requisites

The user must have a Program Manager role. See [Create User and Assign Role](/1.0.0/guides/user-guides/assign-roles-to-users) guide.


# Create ODK MTS Connector

## Description

This Guide will help to create the [ODK MTS Connector](/1.0.0/integrations/integration-with-mosip/mts-connector).

## Pre-requisites

* The user must have a Program Manager role.
* ODK form should be available.

## Steps

1. Navigate to the *MTS Connectors* using the menu bar.

<figure><img src="/files/jkIrui923HrVNHcaYCx5" alt=""><figcaption></figcaption></figure>

2. Navigate to the MTS Connector creation page by clicking the *Create* button on the MTS Connector list view page.

<figure><img src="/files/wgiTJvKBfPrhTXNVc0WK" alt=""><figcaption></figcaption></figure>

3. Set *MTS Input Type* as *ODK* and for other fields configuration please go through [ODK MTS Connector Configuration](/1.0.0/integrations/integration-with-mosip/mts-connector).

<figure><img src="/files/YralDHa5gdssvKW9kxUH" alt=""><figcaption></figcaption></figure>

4. Click the *Save* button and the connector will be listed under the MTS  Connectors list view page.
5. Click on *Start* in the MTS Collectors list view page to start the created connector.


# Create OpenG2P Registry MTS Connector

## Description

This Guide will help to create the [OpenG2P registry MTS Connector](/1.0.0/integrations/integration-with-mosip/registry-mts-connector).

## Pre-requisites&#x20;

The user must have a Program Manager role.

## Steps

1. Navigate to the *MTS Connectors* using the menu bar.

<figure><img src="/files/jkIrui923HrVNHcaYCx5" alt=""><figcaption></figcaption></figure>

2. Navigate to the MTS Connector creation page by clicking the *Create* button.

<figure><img src="/files/wgiTJvKBfPrhTXNVc0WK" alt=""><figcaption></figcaption></figure>

3. Set *MTS Input Type* as *OpenG2P Registry* and for other fields configuration please go through [Registry MTS Connector](/1.0.0/integrations/integration-with-mosip/registry-mts-connector).

<figure><img src="/files/BUCF95uJcfbPxMOurwA7" alt=""><figcaption></figcaption></figure>

4. Click on the *Start* button under the MTS Connectors list view page to start the created connector.
5. Click the *Save* button and the connector will be listed under the MTS  Connectors list view page.


# Enrol Registrants into Program

## Description

This guide will help enrol registrants into a program, who are registered through offline registration and online self-registration process.

## Pre-requisites

* The user must have a Program Manager role. See [Create User and Assign Role](/1.0.0/guides/user-guides/assign-roles-to-users) guide.
* There should be registrants with respect to the program

## Steps

1. &#x20;Navigate to *Programs* using the menu bar.

<figure><img src="/files/gMb0sO9M97iLNI2bE0pt" alt=""><figcaption></figcaption></figure>

2. Click on the program name on which enrolment needs to be done.

<figure><img src="/files/go2XgnirkzeXcosItga9" alt=""><figcaption></figcaption></figure>

3. After landing on Program detailed view page, check the *beneficiaries* section for the registrants who are in draft status.

<figure><img src="/files/xiqb9rIDz82oKeq6S6ZI" alt=""><figcaption></figcaption></figure>

<figure><img src="/files/Zc9q1SPkKA4BSEd8Yunh" alt=""><figcaption></figcaption></figure>

4. Navigate back to the program list view page and click on *Enrol Eligible Registrants* to enrol the registrants who are in draft status.
5. Enrolment of registrants will be based on the Eligibility criteria set as per the program.
6. The registrants who pass the eligibility criteria will be enrolled on the program with *Enrolled* status and those who fail the eligibility criteria will be given *Not Eligible* status.

<figure><img src="/files/s29S9vATmV0Nj00PIRhi" alt=""><figcaption></figcaption></figure>


# Create and Approve Disbursement Cycle

## Description

This guide will provide the steps to create and approve the disbursement cycle under a program.

## Pre-requisites

The user should have a role which is configured in the *Approver Group* under *Configure the Cycle Manager* while [creating program](/1.0.0/guides/user-guides/create-a-program).

## Steps

1. Navigate to *Programs* using the menu bar.

<figure><img src="/files/gMb0sO9M97iLNI2bE0pt" alt=""><figcaption></figcaption></figure>

2. Click on the program name for which cycle needs to be created.

<figure><img src="/files/go2XgnirkzeXcosItga9" alt=""><figcaption></figcaption></figure>

3. After Clicking on *Create New Cycle*, the new cycle will be added in the cycle section with *Draft* status.

<figure><img src="/files/xiqb9rIDz82oKeq6S6ZI" alt=""><figcaption></figcaption></figure>

<figure><img src="/files/S2hGYaHf2PhcXLQgI2Un" alt=""><figcaption></figcaption></figure>

4. Navigate inside the cycle using the arrow icon button beside the cycle name.&#x20;
5. After clicking on *Copy Beneficiaries from Program* button program beneficiaries will be copied into the cycle.

<figure><img src="/files/ByIMvDhU863LZ0eUlawj" alt=""><figcaption></figcaption></figure>

6. Click on *Prepare Entitlement* to create entitlements to beneficiaries as per the Entitlement Manager configuration

<figure><img src="/files/9FvmQDCdKJ16cvVdCknm" alt=""><figcaption></figcaption></figure>

7. Once the entitlement is ready click on *Approve* button where cycle status will be moved from *Draft* to To *Approve*.

<figure><img src="/files/9ZzbtiS4gpmBkczRw4Ip" alt=""><figcaption></figcaption></figure>

8. Once more click on *Approve* button to approve the cycle and the cycle status will be moved from *To Approve* to *Approved.*

<figure><img src="/files/2aI94La2RsmIP0OAfgmD" alt=""><figcaption></figcaption></figure>


# Prepare and Send Payment

## Description

This guide provides the steps to prepare payment after approving the cycle of a program.

## Pre-requisites

The program cycle should be created for a program.

## Steps

1. Navigate to the program for which [cycle creation and approval](/1.0.0/guides/user-guides/create-and-approve-disbursement-cycle) are done.

<figure><img src="/files/2aI94La2RsmIP0OAfgmD" alt=""><figcaption></figcaption></figure>

2. Click on the *Prepare Payment* button to create a batch for the approved cycle entitlements.

<figure><img src="/files/3KmqfMw4U07kdgKsUxzL" alt=""><figcaption></figcaption></figure>

3. Once the payment batch is created, navigate to *Accounting*.
4. Click on *Payment Batches* to proceed further with payment.

<figure><img src="/files/dtQT7ESMHLpH1GVVzaMa" alt=""><figcaption></figcaption></figure>

5. Click on the payment batch to which payment needs to be done.

<figure><img src="/files/KmLCr7atbRnl5dqmnRWG" alt=""><figcaption></figcaption></figure>

6. On the payment batch, detailed view page click on *Send Payment* button to make the payment.

<figure><img src="/files/OmqCLAAMm6F6qNAf4chj" alt=""><figcaption></figcaption></figure>

7. Check the payment status in the payments section of the payment batches detailed view page.

<figure><img src="/files/jYLyTr5Kf9IZ4sfvx2kS" alt=""><figcaption></figcaption></figure>


# Create Payment Manager under Program

## Description

This guide provides steps to create and configure the payment manager.

## Pre-requisites

The user must have the Program Manager role.

## Steps

1. Navigate to *Programs* using the menu bar.

<figure><img src="/files/gMb0sO9M97iLNI2bE0pt" alt=""><figcaption></figcaption></figure>

2. Click on the program name for which configuration to be done.

<figure><img src="/files/go2XgnirkzeXcosItga9" alt=""><figcaption></figcaption></figure>

3. Navigate to the *Configuration* section on Program detailed view page.

<figure><img src="/files/xiqb9rIDz82oKeq6S6ZI" alt=""><figcaption></figcaption></figure>

4. Click on *Add a line* in the *Payment Manager* section.

<figure><img src="/files/CA766K6fdzl9ifMzJSni" alt=""><figcaption></figcaption></figure>

5. Click on the *Create* button on the Add: Payment Managers pop-up window.

<figure><img src="/files/CdW49wxr8dYbSSD7VGpR" alt=""><figcaption></figcaption></figure>

6. Select the payment manager type.

<figure><img src="/files/PWDdn4J50sUXOqRhRmF7" alt=""><figcaption></figcaption></figure>

7. If a payment manager is already created ([Create Payment Manager](/1.0.0/guides/user-guides/create-payment-manager-types)), search and select the same or else once the name is provided to the program manager, *Create and Edit* buttons will appear. Click on *Create and Edit* to create a payment manager.

<figure><img src="/files/HmJ4OJPTmGa8kNAGajgV" alt=""><figcaption></figcaption></figure>

8. Provide the details in the payment manager creation manager.&#x20;

<figure><img src="/files/b17NwnI2OzNmi6CbYO4q" alt=""><figcaption></figcaption></figure>

9. Click on the *Save* button and then click on the *Save & Close* button which will save the payment manager to that program under configuration.

<figure><img src="/files/8xKuYR4BuPYG3W92hDQr" alt=""><figcaption></figcaption></figure>


# Create Payment Manager Types

## Description

This guide will provide the types of payment managers that can be created and then can be configured to the program accordingly.

1. [Payment Hub EE Payment Manager](/1.0.0/guides/user-guides/create-payment-manager-types/create-payment-hub-ee-payment-manager)
2. [Payment Interoperability Layer Payment Manager](/1.0.0/guides/user-guides/create-payment-manager-types/create-payment-interoperability-layer-payment-manager)
3. [Default Payment Manager](/1.0.0/guides/user-guides/create-payment-manager-types/create-default-payment-manager)


# Create Payment Hub EE Payment Manager

## Description

This guide provides the steps to create Payment Hub EE Payment Manager.

## Pre-requisites

The user should have a Program Manager role.

## Steps

1. Navigate to *Programs* using the menu bar.

<figure><img src="/files/gMb0sO9M97iLNI2bE0pt" alt=""><figcaption></figcaption></figure>

2. Click on Configuration and then on Payment Hub EE Payment Manager.&#x20;

<figure><img src="/files/JsNFERNVdNLZH2RZswag" alt=""><figcaption></figcaption></figure>

3. Click on *Create* button which will navigate to the Payment Hub EE Payment Manager creation page.

<figure><img src="/files/qLsDqxACss5DcmTKXF2j" alt=""><figcaption></figcaption></figure>

4. In the payment manager creation page provide a name for the payment manager, select the program name, select Automatically Create batch if needed, and all the other configurations will auto-populate and can be changed accordingly.

<figure><img src="/files/CK5lErsMH5zUfZPK6bLr" alt=""><figcaption></figcaption></figure>

5. Once the payment manager is saved it will be listed under the payment manager list view page which further can be used under the program configuration for which it was created.

<figure><img src="/files/BTc3ETk2xknElxooBBUo" alt=""><figcaption></figcaption></figure>


# Create Payment Interoperability Layer Payment Manager

## Description

This guide provides the steps to create a Payment Interoperability Layer Payment Manager.

## Pre-requisites

The user should have a Program Manager role.

## Steps

1. Navigate to *Programs* using the menu bar.

<figure><img src="/files/gMb0sO9M97iLNI2bE0pt" alt=""><figcaption></figcaption></figure>

2. Click on Configuration and then on Payment Interoperability Layer Payment Manager.&#x20;

<figure><img src="/files/JsNFERNVdNLZH2RZswag" alt=""><figcaption></figcaption></figure>

3. Click on Create button which will navigate to the Payment Interoperability Layar Payment Manager creation page.

<figure><img src="/files/qLsDqxACss5DcmTKXF2j" alt=""><figcaption></figcaption></figure>

4. In the payment manager creation page provide a name for the payment manager, select the program name, select Automatically Create batch if required, provide the Payment End Point URL and Select the Payee DFSP ID Type.

<figure><img src="/files/azGghhydl4jHGUY0iaom" alt=""><figcaption></figcaption></figure>

5. Once the payment manager is saved it will be listed under the payment manager list view page which further can be used under the program configuration for which it is mapped.

<figure><img src="/files/pe7k5w3fxTBUxRE4x7uy" alt=""><figcaption></figcaption></figure>


# Create Default Payment Manager

## Description

This guide provides the steps to create a Default Payment Manager.

## Pre-requisites

The user should have a Program Manager role.

## Steps

1. Navigate to *Programs* using the menu bar.

<figure><img src="/files/gMb0sO9M97iLNI2bE0pt" alt=""><figcaption></figcaption></figure>

2. Click on Configuration and then on Payment Interoperability Layer Payment Manager.&#x20;

<figure><img src="/files/JsNFERNVdNLZH2RZswag" alt=""><figcaption></figcaption></figure>

3. Click on Create button which will navigate to the Default Payment Manager creation page.

<figure><img src="/files/qLsDqxACss5DcmTKXF2j" alt=""><figcaption></figcaption></figure>

4. In the payment manager creation page provide a name for the payment manager, select the program name, select Automatically Create batch if required and select the Currency.

<figure><img src="/files/xBYDx1gqkQJOhZBO6ERG" alt=""><figcaption></figcaption></figure>

5. Once the payment manager is saved it will be listed under the payment manager list view page which further can be used under the program configuration for which it was created.

<figure><img src="/files/2fKcj5FCGVafuuDlThAc" alt=""><figcaption></figcaption></figure>


# Create Eligibility Manager under Program

## Description

This guide provides steps to create and configure the eligibility manager inside the program.

## Pre-requisites

The user must have the Program Manager role.

## Steps

1. Navigate to *Programs* using the menu bar.

<figure><img src="/files/gMb0sO9M97iLNI2bE0pt" alt=""><figcaption></figcaption></figure>

2. Click on the program name for which configuration to be done.

<figure><img src="/files/go2XgnirkzeXcosItga9" alt=""><figcaption></figcaption></figure>

3. Navigate to the *Configuration* section on Program detailed view page.

<figure><img src="/files/xiqb9rIDz82oKeq6S6ZI" alt=""><figcaption></figcaption></figure>

4. Click on *Add a line* in the *Eligibility Manager* section.

<figure><img src="/files/ZAr6rPpjuf5hIuEWmp60" alt=""><figcaption></figcaption></figure>

5. Click on the *Create* button on the Add: Eligibility Managers pop-up window.

<figure><img src="/files/U618VGdzUMM7wzUFB9QR" alt=""><figcaption></figcaption></figure>

6. Select the eligibility manager type.

<figure><img src="/files/BsdnEMdxb3X9VrzRbuFy" alt=""><figcaption></figcaption></figure>

7. Once the name is provided to the eligibility manager, *Create* and *Edit* buttons will appear. Click on *Create and Edit* button to create an eligibility manager.

<figure><img src="/files/R9ho3pxutUE0F0NhFyj6" alt=""><figcaption></figcaption></figure>

8. Set the eligibility criteria's using Add Filter button on the creation page.

<figure><img src="/files/4UCuNso3CCkNjdX2jr1c" alt=""><figcaption></figcaption></figure>

9. Click on the Save button and then click on the *Save & Close* button which will save the eligibility manager to that program under configuration.

<figure><img src="/files/QVfHVANKBmkNWlLj1FjN" alt=""><figcaption></figcaption></figure>


# Create Eligibility Manager Types

## Description

There are 3 types of eligibility managers available that can be created and then can be configured to the program accordingly.

1. [Default Eligibility Manager](/1.0.0/guides/user-guides/create-eligibility-manager-1/create-default-eligibility-manager)
2. [ID Document Eligibility Manager](/1.0.0/guides/user-guides/create-eligibility-manager-1/copy-of-create-id-document-eligibility-manager)
3. [Phone Number Eligibility Manager](/1.0.0/guides/user-guides/create-eligibility-manager-1/create-phone-number-eligibility-manager)


# Create Default Eligibility Manager

## Description

This guide provides the steps to create a default eligibility manager

## Pre-requisites

user should have a Program Manager role.

## Steps

1. Navigate to *Programs* using the menu bar.

<figure><img src="/files/gMb0sO9M97iLNI2bE0pt" alt=""><figcaption></figcaption></figure>

2. Click on *Configuration* and then on *Default Eligibility Manager.*&#x20;

<figure><img src="/files/JsNFERNVdNLZH2RZswag" alt=""><figcaption></figcaption></figure>

3. Click *Create* a button on the default eligibility manager list view page.

<figure><img src="/files/ACFofxBsWnSPiLjBFPb2" alt=""><figcaption></figcaption></figure>

4. Provide the name for the eligibility manager and select the program name from the drop-down for which the eligibility manager is created.

<figure><img src="/files/7K8OA3wxApSVLDtcoTPb" alt=""><figcaption></figcaption></figure>

4. Use *+Add filter* to set eligibility criteria using [Domain Filters](/1.0.0/beneficiary-management/eligibility#domain-filters). You may specify multiple eligibility criteria.

<figure><img src="/files/mxVf3iJyF8AQmcid1TkY" alt=""><figcaption></figcaption></figure>

5. Click the *Save* button to save the eligibility manager and it will be listed under the eligibility manager list view page.&#x20;


# Create ID Document Eligibility Manager

## Description

This guide provides the steps to create an ID document eligibility manager

## Pre-requisites

user should have a Program Manager role.

## Steps

1. Navigate to *Programs* using the menu bar.

<figure><img src="/files/gMb0sO9M97iLNI2bE0pt" alt=""><figcaption></figcaption></figure>

2. Click on *Configuration* and then on *ID document Eligibility Manager.*&#x20;

<figure><img src="/files/JsNFERNVdNLZH2RZswag" alt=""><figcaption></figcaption></figure>

3. Click *Create* a button on the ID document eligibility manager list view page.

<figure><img src="/files/ACFofxBsWnSPiLjBFPb2" alt=""><figcaption></figcaption></figure>

4. Provide the name for the eligibility manager and select the program name from the drop-down for which the eligibility manager is created.

<figure><img src="/files/3cbgLevnZ3yC2hjMK2ft" alt=""><figcaption></figcaption></figure>

5. Click the *Save* button to save the eligibility manager and it will be listed under the eligibility manager list view page.&#x20;

<figure><img src="/files/yEDQn10REYn1uusXwxTa" alt=""><figcaption></figcaption></figure>


# Create Phone Number Eligibility Manager

## Description

This guide provides the steps to create an phone number eligibility manager

## Pre-requisites

user should have a Program Manager role.

## Steps

1. Navigate to *Programs* using the menu bar.

<figure><img src="/files/gMb0sO9M97iLNI2bE0pt" alt=""><figcaption></figcaption></figure>

2. Click on *Configuration* and then on *ID document Eligibility Manager.*&#x20;

<figure><img src="/files/JsNFERNVdNLZH2RZswag" alt=""><figcaption></figcaption></figure>

3. Click *Create* a button on the phone number eligibility manager list view page.

<figure><img src="/files/ACFofxBsWnSPiLjBFPb2" alt=""><figcaption></figcaption></figure>

4. Provide the name for the eligibility manager and select the program name from the drop-down for which the eligibility manager is created.

<figure><img src="/files/nu9W6Oorl7SVH5c9BDJJ" alt=""><figcaption></figcaption></figure>

5. Click the *Save* button to save the eligibility manager and it will be listed under the eligibility manager list view page.&#x20;

<figure><img src="/files/qAioxLQvgE8tDMpxxCss" alt=""><figcaption></figcaption></figure>


# Create Deduplication Manager under Program

## Description

This guide provides steps to create and configure the deduplication manager inside the program.

## Pre-requisites

The user must have the Program Manager role.

## Steps

1. Navigate to *Programs* using the menu bar.

<figure><img src="/files/gMb0sO9M97iLNI2bE0pt" alt=""><figcaption></figcaption></figure>

2. Click on the program name for which configuration to be done.

<figure><img src="/files/go2XgnirkzeXcosItga9" alt=""><figcaption></figcaption></figure>

3. Navigate to the *Configuration* section on Program detailed view page.

<figure><img src="/files/xiqb9rIDz82oKeq6S6ZI" alt=""><figcaption></figcaption></figure>

4. Click on *Add a line* in the *Deduplication Manager* section.

<figure><img src="/files/8tE7V0LCymo8eOFgYbyq" alt=""><figcaption></figcaption></figure>

5. Click on the *Create* button on the Add: Deduplication Managers pop-up window.

<figure><img src="/files/LOw4yhoq7XUeRHOlKdRO" alt=""><figcaption></figcaption></figure>

6. Select the deduplication manager type.

<figure><img src="/files/syxAJiB7J12b7vXzG35l" alt=""><figcaption></figcaption></figure>

7. Once the name is provided to the deduplication manager, Create and Edit buttons will appear to click on Create and Edit button to create a deduplication manager.&#x20;

<figure><img src="/files/05czFwvqRtEa4mxeQhTK" alt=""><figcaption></figcaption></figure>

8. Select the ID type from the Supported ID Document Types drop-down.

<figure><img src="/files/c9RLhcLyspKpK3UbUwsv" alt=""><figcaption></figcaption></figure>

9. Click on the *Save* button and then click on the *Save & Close* button which will save the deduplication manager to that program under configuration.

<figure><img src="/files/v4mz5oSyYAzEuG5f1KQw" alt=""><figcaption></figcaption></figure>


# Create Deduplication Manager Types

## Description

There are 2 types of deduplication managers available that can be created and then can be configured to the program accordingly.

1. [ID Deduplication Manager](/1.0.0/guides/user-guides/create-deduplication-manager-types/create-id-deduplication-manager)
2. [Phone Number Deduplication](/1.0.0/guides/user-guides/create-deduplication-manager-types/create-phone-number-deduplication)


# Create ID Deduplication Manager

## Description

This guide provides steps to create an ID Deduplication manager.

## Pre-requisites

The user should be assigned to the Program Manager role.

## Steps

1. Navigate to *Programs* using the menu bar.

<figure><img src="/files/gMb0sO9M97iLNI2bE0pt" alt=""><figcaption></figcaption></figure>

2. Click on *Configuration* and then on *ID Deduplication Manager.*

<figure><img src="/files/JsNFERNVdNLZH2RZswag" alt=""><figcaption></figcaption></figure>

3. Click the Create button to navigate to the ID deduplication manager creation page.

<figure><img src="/files/NyvZqgXJjKjZk3Met7BO" alt=""><figcaption></figcaption></figure>

4. In the ID deduplication manager creation page provide a name for the ID deduplication manager, and select the program name and the ID type from the Supported ID Document Types drop-down.

<figure><img src="/files/k4qPXvMsNI9hVqlBxP4T" alt=""><figcaption></figcaption></figure>

4. Once the ID deduplication manager is saved it will be listed under the ID deduplication manager list view page which can further be used under the program configuration for which it is mapped.

<figure><img src="/files/ww4g1zj772X3osocaHLU" alt=""><figcaption></figcaption></figure>


# Create Phone Number Deduplication

## Description

This guide provides steps to create a Phone Number Deduplication manager.

## Pre-requisites

The user should be assigned to the Program Manager role.

## Steps

1. Navigate to *Programs* using the menu bar.

<figure><img src="/files/gMb0sO9M97iLNI2bE0pt" alt=""><figcaption></figcaption></figure>

2. Click on Configuration and then on *ID Deduplication Manager.*

<figure><img src="/files/JsNFERNVdNLZH2RZswag" alt=""><figcaption></figcaption></figure>

3. Click the Create button to navigate to the Phone Number Deduplication manager creation page.

<figure><img src="/files/d7PYlxV3b1dbN7fIJ833" alt=""><figcaption></figcaption></figure>

4. In the Phone Number Deduplication manager creation page provide a name for the Phone Number Deduplication manager, and select the program name.
5. Once the Phone Number Deduplication manager is saved it will be listed under the Phone Number Deduplication manager list view page which can further be used under the program configuration for which it is mapped.


# Create Notification Manager under Program

## Description

This guide provides steps to create and configure the notification manager.

## Pre-requisites

The user must have the Program Manager role.

## Steps

1. Navigate to *Programs* using the menu bar.&#x20;

<figure><img src="/files/gMb0sO9M97iLNI2bE0pt" alt=""><figcaption></figcaption></figure>

2. Click on the program name for which configuration to be done.&#x20;

<figure><img src="/files/go2XgnirkzeXcosItga9" alt=""><figcaption></figcaption></figure>

3. Navigate to the *Configuration* section on Program detailed view page.

<figure><img src="/files/xiqb9rIDz82oKeq6S6ZI" alt=""><figcaption></figcaption></figure>

4. &#x20;Click on *Add a line* in the Notification Manager section.&#x20;

<figure><img src="/files/phIaheR92JSjE0f5FWgz" alt=""><figcaption></figcaption></figure>

5. Click on the *Create* button on the Add: Notification Managers pop-up window.&#x20;

<figure><img src="/files/Dz3Icj9jRbObPlhKB3KE" alt=""><figcaption></figcaption></figure>

6. Select the notification manager type.&#x20;

<figure><img src="/files/JYveFS8xDSdhrKUA1LdL" alt=""><figcaption></figcaption></figure>

7. Once the name is provided to the deduplication manager, *Create and Edit* buttons will appear. Click on *Create and Edit* to create a deduplication manager. &#x20;

<figure><img src="/files/Czi1rRnhHgMxpIVD1PyM" alt=""><figcaption></figcaption></figure>

8. Click on the *Save & Close* button which will save the notification manager to that program under configuration.

<figure><img src="/files/0GZ6Y5QRzdzq9WtTckR8" alt=""><figcaption></figcaption></figure>


# Create Notification Manager Types

## Description

There are 3 types of notification managers available that can be created and then can be configured to the program accordingly.

1. SMS Notification Manager
2. Email Notification Manager
3. Fast2SMS Notification Manager


# Create SMS Notification Manager

## Description

This guide will provide the steps to create an SMS notification manager.

## Pre-requisites

The user should have a Program Manager role assigned.

## Steps

1. Navigate to *Programs* using the menu bar
2. Click on *Configuration* and then on *SMS Notification Manager.*
3. Click the *Create* button to navigate to the SMS notification manager creation page.


# Create Email Notification Manager

## Description

This guide will provide the steps to create an Email notification manager.

## Pre-requisites

The user should have a Program Manager role assigned.

## Steps

1. Navigate to *Programs* using the menu bar.

<figure><img src="/files/gMb0sO9M97iLNI2bE0pt" alt=""><figcaption></figcaption></figure>

2. Click on *Configuration* and then on *Email Notification Manager.*

<figure><img src="/files/JsNFERNVdNLZH2RZswag" alt=""><figcaption></figcaption></figure>

3. Click the *Create* button to navigate to the email notification manager creation page.

<figure><img src="/files/ukN3n1fDbpFrbJxYJKDR" alt=""><figcaption></figcaption></figure>

4. Email notification manager creation page

* *Name*: Provide a name for the manager
* *Program*: Select the program from the drop-down for which the manager is created
* *On Enrolled In Program Template*: Select the template from the drop-down for program enrolment notification.
* *On Cycle Started Template:* Select the template from the drop-down for the program cycle started notification.
* *On Cycle Ended Template*: Select the template from the drop-down for the program cycle-ended notification.
* Select *Send Immediately* to send the email notification to beneficiaries after the program enrollment, at the start of the cycle and at the end of a cycle.

<figure><img src="/files/GtDJeT8tXopcoVSQzbp0" alt=""><figcaption></figcaption></figure>

5. After clicking on the *Save* button notification will be saved under the email notification manager list view page.


# Create Fast2SMS Notification Manager

## Description

This guide will provide the steps to create a Fast2SMS notification manager.

## Pre-requisites

## Steps

1. Navigate to *Programs* using the menu bar.

<figure><img src="/files/gMb0sO9M97iLNI2bE0pt" alt=""><figcaption></figcaption></figure>

2. Click on *Configuration* and then on *Fast2SMS Notification Manager.*

<figure><img src="/files/JsNFERNVdNLZH2RZswag" alt=""><figcaption></figcaption></figure>

2. Click the *Create* button to navigate to the Fast2SMS notification manager creation page.

<figure><img src="/files/jQsMMwNt4G6rvTZL1f14" alt=""><figcaption></figcaption></figure>

3. Fast2SMS notification manager creation page

* *Name*: Provide a name for the manager
* *Program*: Select the program from the drop-down for which the manager is created
* *On Enrolled In Program Template*: Select the template from the drop-down for program enrolment notification.
* *On Cycle Started Template:* Select the template from the drop-down for the program cycle started notification.
* *On Cycle Ended Template*: Select the template from the drop-down for the program cycle-ended notification.
* *Send API Endpoint*: Provide the service provider API endpoint.
* *Access Token*: Provide the access token of the service provider.

<figure><img src="/files/WewZaGbjdf459Tc6RqA4" alt=""><figcaption></figcaption></figure>

5. After clicking on the *Save* button notification will be saved under the Fast2SMS notification manager list view page.


# Send Notification to Individual Registrants

TBD


# Configure ID Types


# Map ODK Form

TBD


# Integrate with MOSIP e-Signet

## Description

This guide provides steps to integrate [OpenG2P with e-Signet with MOSIP](/1.0.0/integrations/integration-with-mosip/integration-with-e-signet) as the authentication provider. &#x20;

## Prerequisites

1. MOSIP IDA is installed
2. The e-Signet server is installed and configured to connect to MOSIP IDA
3. MOSIP IDA APIs are accessible from the machine running the e-Signet server
4. Both Yes/No and KYC APIs are enabled on MOSIP IDA
5. e-Signet APIs are accessible from machines running OpenG2P
6. Biometric auth devices (already onboarded on MOSIP) are available for authentication
7. Email and SMS are enabled on MOSIP IDA for OTP authentication
8. MOSIP Partner Management Services (PMS) Portal or APIs must be accessible to both MOSIP Partner Admin and OpenG2P Admin
9. MOSIP Partner Specific User Token (PSUT) ID type is configured. See [Configure ID Types](/1.0.0/guides/user-guides/configure-id-types).

## Steps

### Configure OpenG2P as a partner on MOSIP

1. Create an **Auth Partner** for OpenG2P on MOSIP.
   * [Guide](https://docs.mosip.io/1.2.0/modules/partner-management-services/auth-credential-partner) for MOSIP 1.2.0
   * Guide for MOSIP 1.1.5 (TBD)
2. Create a **MISP Partner** for OpenG2P on MOSIP.
3. Note down the following from the above steps:
   1. Auth Partner ID&#x20;
   2. Auth Policy ID&#x20;
   3. Auth API Key
   4. MISP License Key
   5. Auth partner signed certificate&#x20;
   6. IDA Partner certificate (App id: IDA, Ref Id: PARTNER)

### Configure OpenG2P as relying party on e-Signet

#### Using PMS API

This method is applicable if MOSIP Partner Management APIs are available. These steps are executed by MOSIP Partner Admin

1. Create an e-Signet OIDC client using PMS OIDC API:

{% openapi src="/files/ZYwl1gsgqsVWvpYs6XT6" path="/oidc/client" method="post" %}
[pms-api-docs.json](https://1531528365-files.gitbook.io/~/files/v0/b/gitbook-x-prod.appspot.com/o/spaces%2FxkdlCOLME2p03rS8nG8u%2Fuploads%2Ffmy7Wsc4ywRUnD6LOpRV%2Fpms-api-docs.json?alt=media\&token=60f7fdfe-ae54-4ad1-998e-21f16c611e86)
{% endopenapi %}

* `authParnterId:` Partner ID in [this](#configure-openg2p-as-a-partner-on-mosip) step.
* `policyId` : Policy ID in [this](#configure-openg2p-as-a-partner-on-mosip) step.
* `publicKey:` Generate [JWK](https://openid.net/specs/draft-jones-json-web-key-03.html).
* `logoUri`: URL of your logo accessible publicly.
* `grantTypes` = `["authorization_code"]`
* `clientAuthMethods`= `["private_key_jwt"]`
* `redirectUris`: URLs of the form `https://<your web portal>/auth_oauth/signin`

Note down the Client ID as an output of the above step.

#### Using e-Signet API

This method is applicable if MOSIP Partner Management APIs are **not** available.

1. Create an e-Signet OIDC client using the following API:

{% openapi src="/files/i3rHb0kFESGYeNsJKH0A" path="/client-mgmt/oidc-client" method="post" %}
[esignet-api-docs.json](https://1531528365-files.gitbook.io/~/files/v0/b/gitbook-x-prod.appspot.com/o/spaces%2FxkdlCOLME2p03rS8nG8u%2Fuploads%2Flycn46OQEEUdMlOxcOfx%2Fesignet-api-docs.json?alt=media\&token=f50f7894-e2b4-4d6f-b7c1-a6e25b15d8a8)
{% endopenapi %}

* `clientId:` Arbitrary string.
* `clientName:` Arbitrary string.
* `relyingParnterId:` Partner ID in [this](#configure-openg2p-as-a-partner-on-mosip) step.
* `publicKey:` Generated [JWK](https://openid.net/specs/draft-jones-json-web-key-03.html).
* `authContextRefs`:&#x20;

  ```
  ["mosip:idp:acr:biometrics","mosip:idp:acr:generated-code"]
  ```
* `userClaims`:&#x20;

  ```
  ["birthdate","address","gender","name","phone_number","email","picture"]
  ```
* `logoUri`: URL of your logo accessible publicly.
* `grantTypes` = `["authorization_code"]`
* `clientAuthMethods`= `["private_key_jwt"]`
* `redirectUris`: URLs of the form `https://<your web portal>/auth_oauth/signin`

### Enable e-Signet on OpenG2P

These steps are executed by OpenG2P Admin on the OpenG2P Admin interface.

1. Go to *Settings -> General Settings (Menu) -> General Settings (Panel) -> Integrations (Section) -> Oauth Providers*

<figure><img src="/files/whZ9cQ61g2uY1l8faGeo" alt=""><figcaption></figcaption></figure>

<figure><img src="/files/LUlkLmOHZdlyixegjC6o" alt=""><figcaption></figcaption></figure>

2. Create a new OIDC Provider with the following details:

| Parameter                                | Value                                                                                                         |                                                                                                        |
| ---------------------------------------- | ------------------------------------------------------------------------------------------------------------- | ------------------------------------------------------------------------------------------------------ |
| Client ID                                | The output of the [previous section](#configure-openg2p-as-relying-party-on-e-signet).                        |                                                                                                        |
| Auth Flow                                | `OpenID Connect (authorization code flow)`                                                                    |                                                                                                        |
| Token map                                | `sub:user_id`                                                                                                 |                                                                                                        |
| Client Authentication Method             | `Private Key JWT`                                                                                             |                                                                                                        |
| Private Key Method                       | Private key used for JWK creation in the [previous section](#configure-openg2p-as-relying-party-on-e-signet). |                                                                                                        |
| Assertion Type                           | `JWT Bearer`                                                                                                  |                                                                                                        |
| Authorization URL                        | e-Signet's authorize endpoint.                                                                                | Example: <https://esignet.mec.mosip.net/authorize>                                                     |
| Userinfo URL                             | e-Signet's userinfo API                                                                                       | Example: <https://api.mec.mosip.net/v1/esignet/oidc/userinfo>                                          |
| Token URL                                | e-Signet's token API                                                                                          | Example: <https://api.mec.mosip.net/v1/esignet/oauth/token>                                            |
| JWKS URL                                 | e-Signet's JWKS API                                                                                           | Example: <https://api.mec.mosip.net/v1/esignet/oauth/.well-known/jwks.json>                            |
| Use G2P Reg ID                           | `True`                                                                                                        |                                                                                                        |
| G2P Registrant ID Type                   | MOSIP PSUT ID Type                                                                                            | As configured in step 9 of [Prerequisites](#prerequisites).                                            |
| Partner Creation Call Validate URL       | `True`                                                                                                        | Specifies whether to call the MOSIP e-KYC API to fetch data into OpenG2P                               |
| Partner Creation Validate Response       | `name:name email:email phone:phone_number birthdate:birthdate gender:gender address:address`                  |                                                                                                        |
| Default Group User Creation              | `User types / Portal`                                                                                         | Specifies all users signing up through this OIDC Provider (e-Signet) are only going to be portal users |
| Login Attribute Mapping On User Creation | `email`                                                                                                       | To allow users to sign in with their email and password after initial signup with e-Signet.            |


# Map Self Service Portal Form

TBD

##


# Install WireGuard App And Activate Tunnel

## Description&#x20;

The guide here provides steps to install WireGuard App and activate the tunnel. This app allows users to create an encrypted VPN for secure communication.

## Pre-requisites

The user must possess an Android Phone. The user should reach out to the system administrator to generate the Wireguard conf file before proceeding with the installation.

## Steps

1. Search for "wireguard" in the Android Play Store.&#x20;

<figure><img src="/files/e2697MR22RhTfq4PQMqu" alt=""><figcaption></figcaption></figure>

2. Install the WireGuard app, open it, and click on the + icon to add the tunnel.

<figure><img src="/files/BqSebt0nx5yHOtxbEP2P" alt=""><figcaption></figcaption></figure>

3. A list of options will appear from the bottom of the app. Click the *Import from file or archive* option.&#x20;

<figure><img src="/files/fOxIWryvuGUi0PECvdEx" alt=""><figcaption></figcaption></figure>

4. Select the WireGuard conf file provided by the system administrator. On successful tunnel creation, the tunnel name will appear at the top of the app.

<figure><img src="/files/RVRDs0N5Ag2SDUhdEIMH" alt=""><figcaption></figcaption></figure>

5. Activate the tunnel in WireGuard.

<figure><img src="/files/Z4OKrJOTds4J0rCbROoh" alt=""><figcaption></figcaption></figure>


# Install SmartScanner App

## Description  <a href="#description" id="description"></a>

The guide here provides steps to install the SmartScanner app. This app allows users to scan the QR code in the entitlement voucher.

## Pre-requisites <a href="#pre-requisites" id="pre-requisites"></a>

The user must possess an Android Phone with [WireGuard tunnel](https://app.gitbook.com/o/bnTr6Kp4z4CXR4QVIPSa/s/yo3DQVnJdJ1Ym7dquuyV/guides/how-to-guides/install-wireguard-app-and-activate-tunnel) activated.

## Steps <a href="#steps" id="steps"></a>

1. Download the SmartScanner APK file named *idpass-smart-scanner-untagged-\<version>.apk* on your Android mobile from [here](https://drive.google.com/drive/folders/1FMQQtPcKeDnhM3vfR-_EQHeEvzaPKhfq?usp=drive_link).

<figure><img src="https://files.gitbook.com/v0/b/gitbook-x-prod.appspot.com/o/spaces%2Fyo3DQVnJdJ1Ym7dquuyV%2Fuploads%2FLf81QdlMwMQKJdoShi0M%2Fimage.png?alt=media&#x26;token=8addbe6e-ff12-4821-8a56-bbfe260af11a" alt=""><figcaption></figcaption></figure>

2. Go to the Downloads folder in Android Mobile and click on the .apk file that you downloaded in the first step. A user prompt will appear with the options *CANCEL* and *INSTALL.* Click on *INSTALL*.

<figure><img src="https://files.gitbook.com/v0/b/gitbook-x-prod.appspot.com/o/spaces%2Fyo3DQVnJdJ1Ym7dquuyV%2Fuploads%2FAxWMaz5TyaoTQTDSQyb9%2Fimage.png?alt=media&#x26;token=3be2adaa-5574-4e23-9a7c-11a978dcc772" alt=""><figcaption></figcaption></figure>

3. For first-time installation, a user prompt may appear to allow unknown apps. Click on *Settings.* If no prompt appears and the application installs, then go to step#5.

<figure><img src="https://files.gitbook.com/v0/b/gitbook-x-prod.appspot.com/o/spaces%2Fyo3DQVnJdJ1Ym7dquuyV%2Fuploads%2FW2bcCG7uqh0d1U6zDk7q%2Fimage.png?alt=media&#x26;token=9f48fd6b-5662-4995-a48a-447ae9c5fcde" alt=""><figcaption></figcaption></figure>

4. Enable the option *Allow apps from this source,* click on the downloaded file, and install the application as described in step#2.

<figure><img src="/files/vcPSIOo7I3gXkp6RHq2e" alt=""><figcaption></figcaption></figure>

5. If the SmartScanner app is successfully installed, then this icon will appear on the mobile screen.

<figure><img src="/files/TDWMjz5UO94ICb1zQhCt" alt=""><figcaption></figcaption></figure>

6. Open the SmartScanner app. It should show the option *Voucher Code*.

<figure><img src="/files/bccVJcEESj5LByTvanTa" alt=""><figcaption></figcaption></figure>

7. Click on the *Voucher Code* and scan the QR code shown here.

<figure><img src="/files/sm8vD1QJPqHr7NECqXp0" alt=""><figcaption></figcaption></figure>

8. If the SmartScanner app is successfully installed, then the scan will show these details.

<figure><img src="/files/cPcGdklfGu2ca8dG0JLS" alt=""><figcaption></figcaption></figure>


# Submit Reimbursement Using the Service Provider Portal

## Description&#x20;

The guide here provides steps to submit reimbursement using Service Provider Portal.

## Pre-requisites

The Service Provider Portal user has login access to the portal using MOSIP ID/National ID. The user should be able to scan the QR code from the entitlement voucher using [SmartScanner App](broken://pages/qKBg8f91ERUYaR2diBAX).

## Steps

1. Login into the Service Provider Portal using MOSIP ID/National ID. In the example below, the National ID of the Philippines (PhilSys ID) is shown.

<figure><img src="/files/VetFvUGBa0IHup7L0of7" alt=""><figcaption></figcaption></figure>

2. Upon successful login, you will see the *Reimbursements* dashboard.

<figure><img src="/files/QyX25w3NNe4RdMBaudzD" alt=""><figcaption></figcaption></figure>

3. Select the desired beneficiary and click on *Apply*. Applying for the reimbursement takes you to the *Submission Form* page.&#x20;

<figure><img src="/files/6hQ2AWt4wRB0N0gsm9Z3" alt=""><figcaption></figcaption></figure>

5. The beneficiary details are available by scanning the QR code on the entitlement voucher (also called Guarantee Letter) using the [SmartScanner app](/1.0.0/guides/user-guides/install-smartscanner-app). The scan should show details similar to the format in the image below.&#x20;

<figure><img src="/files/ekgeCNcTmMjRNHj9Djo0" alt=""><figcaption></figcaption></figure>

6. Enter the details from the scan into the *Submission Form and* click *Submit*. This will show a user prompt to confirm the details. Click *Submit*.

<figure><img src="/files/kILwQBa3KhYOanXizSzQ" alt=""><figcaption></figcaption></figure>

7. Successful submission will show a confirmation page with details such as the application Id and submission date.&#x20;

<figure><img src="/files/poSCqlfCpEgGwYSkFzfs" alt=""><figcaption></figcaption></figure>

8. You can optionally click *Go to Home* to view the submitted reimbursements. You should see that the status of reimbursement has changed to *Applied*.

<figure><img src="/files/KEO9mw7EAQCkeKMgDohJ" alt=""><figcaption></figcaption></figure>


# Documentation Guides


# Creating Diagrams

## Context

Creating editable diagrams in open formats using open source tools is challenging. Here, we suggest [Draw.io](https://app.diagrams.net/) for creating diagrams and saving them directly in GitHub repository.

## Creating new diagram

1. On [Draw.io](https://app.diagrams.net/) website choose *Device* as your storage.

<figure><img src="/files/tPbekYzGIiUUw0AoaMy5" alt=""><figcaption></figcaption></figure>

2. Select the format of the diagram as XML`.drawio.`&#x20;

<figure><img src="/files/EMVxKEyuhJt80EgI92jc" alt=""><figcaption></figcaption></figure>

3. Create the diagram and save it on your local machine. Make sure you follow the file naming convention of lowercase with hyphens as word separations.
4. Fork `openg2p-documentation` repository to your Github account.&#x20;
5. Disable workflow in your repository fork:

<figure><img src="/files/BveGeehL8YMN9OFwHjUj" alt=""><figcaption></figcaption></figure>

6. On Github, upload/commit the `.drawio` file to **your fork** of `openg2p-documentation` repository in the branch of choice to the following folder: `.gitbook/assets`.&#x20;
7. Send a Pull Request.
8. After the PR is merged on the upstream repo a [Gitbook Action Workflow](https://github.com/OpenG2P/openg2p-documentation/blob/1.0.0/.github/workflows/drawio.yml) will get triggered to convert the same to PNG format with `*.png` extension. The PNG file will be available in the same folder as the `.drawio` file. In this case, it will be the repository's `.gitbook/assets` folder.&#x20;
9. On Gitbook, insert the PNG image using the *URL* options shown by Gitbook. The URL to be given will be the GitHub URL e.g. <https://github.com/OpenG2P/openg2p-documentation/raw/1.0.0/.gitbook/assets/add-deduplication-manager.png>. Make sure you pick this URL in **Raw** format which will be available on the *Download* button on Github

<figure><img src="/files/VHeoPbzL417EjshYF29m" alt=""><figcaption></figcaption></figure>

## Editing existing diagram

If a `.drawio` already exists in the `.gitbook/assets` folder then you must directly edit the repository version of the same by following the procedure given below.

1. Fork the `openg2p-documentation` repository to your local Github account. Disable workflow as shown above.
2. On the [Draw.io](https://app.diagrams.net/) website choose Github as your storage.

<figure><img src="/files/tPbekYzGIiUUw0AoaMy5" alt=""><figcaption></figcaption></figure>

3. Authorize the Draw\.io app on Github (follow the steps prompted).&#x20;
4. Select the diagram in `.drawio` format from `openg2p-documentation` --> your branch --> `.gitbook/assests` folder.

<figure><img src="/files/EMVxKEyuhJt80EgI92jc" alt=""><figcaption></figcaption></figure>

5. Make changes.
6. Save the diagram - it will get Git-committed to your repository.
7. Send a Pull Request to `OpenG2P/openg2p-documentation` repo.
8. Upon acceptance of the Pull Request, a [Github Action Workflow](https://github.com/OpenG2P/openg2p-documentation/blob/1.0.0/.github/workflows/drawio.yml) will trigger the conversion of the`.drawio` file to `.png`.&#x20;
9. If you have not added the URL of the PNG to your Gitbook pages follow step 6 of [Creating New Diagram](/1.0.0/guides/documentation-guides/creating-diagrams#creating-new-diagram).
10. If the URL already exists in Gitbook, the updated image should appear after a page refresh.

## Deleting a digram

1. Delete the diagram from Gitbook listing found here:

<div align="center"><figure><img src="/files/nOMXPiHUe6GUkAQYSNuH" alt="" width="256"><figcaption></figcaption></figure></div>

2. Delete the diagram from Github repository `openg2p-documentation` from the corresponding branch&#x20;


# Writing Guidelines For How-To Guides

* Capitalize the first letter of every word in the guide title.
* Use second-person pronouns i.e. you, your, etc. in the instructions/steps.
* It is mandatory to do spelling and grammatical corrections using tools such as Grammarly.
* Use the italicized font for UI elements i.e. dashboard names, button labels, information fields, etc.
* Use the exact name and case for the UI elements.
* Use quotes for a phrase/word if the phrase/word has to be represented as is.
* Provide a link at the first mention of a new/different topic. For example, if the guide is talking about installing the SmartScanner app, and the WireGuard app is mentioned, then provide the link for WireGuard.&#x20;
* Use clear and crisp images.
* The filename for images should follow the naming convention of every word in lower case, and words separated by hyphens i.e. view-all-programs.png.


# 👩💻 👩💻 👩💻 👩💻 👩💻 Developer Zone


# Getting Started


# Technology Stack

This page lists all the technologies used in building OpenG2P. Free and open-source softwares with clear long-term support availability have been chosen. Certain choices can be replaced with other free or commercial options for deployment.

<table><thead><tr><th>Domain</th><th>Tools/Technologies</th><th width="123">Version</th><th>Licence Type</th></tr></thead><tbody><tr><td>Operating System</td><td>Ubuntu Server</td><td>20.04</td><td>Free</td></tr><tr><td>Business Apps</td><td>Odoo</td><td>15.0</td><td>LGPL</td></tr><tr><td>ID System</td><td>MOSIP</td><td>1.2</td><td>MPL 2.0</td></tr><tr><td>Development - Language Runtime</td><td>Python</td><td>3.5+</td><td><a href="https://docs.python.org/3/license.html#psf-license">PSF License</a></td></tr><tr><td>Database</td><td>Postgres</td><td></td><td>Postgres License BSD 2-clause "Simplified License"</td></tr><tr><td>ID Verification</td><td>MOSIP Token Seeder</td><td></td><td>MPL 2.0</td></tr><tr><td>ID Verification</td><td>eSignet</td><td></td><td>MPL 2.0</td></tr><tr><td>Analytics Engine</td><td>Elasticsearch</td><td></td><td>Elastic License 2.0</td></tr><tr><td>Data streaming</td><td>Debezium</td><td></td><td>Apache 2.0</td></tr><tr><td>Offline data collection</td><td>ODK</td><td></td><td>Apache 2.0</td></tr><tr><td>Visualization</td><td>Kibana</td><td></td><td>Elastic License 2.0</td></tr><tr><td>S3 Storage</td><td>MinIO</td><td></td><td>AGPL 3.0</td></tr><tr><td>Development - API Documentation</td><td>Swagger</td><td></td><td>Apache License 2.0</td></tr><tr><td>Task Management</td><td>Jira</td><td></td><td>Commercial (OpenG2P has a free license)</td></tr><tr><td>Source Code Management</td><td>GitHub</td><td></td><td>Commercial (OpenG2P uses Free plan)</td></tr><tr><td>Deployment</td><td>Docker</td><td></td><td>Apache 2.0</td></tr><tr><td>DevOps tools</td><td>Ansible</td><td></td><td>GNU GPL v3.0</td></tr><tr><td>DevOps tools</td><td>Github actions</td><td></td><td>Free</td></tr><tr><td>DevOps tools</td><td>Prometheus</td><td></td><td>Apache License 2.0</td></tr><tr><td>DevOps tools</td><td>Grafana</td><td></td><td>Apache License 2.0</td></tr><tr><td>Messaging</td><td>Apache Kafka</td><td></td><td>Apache License 2.0</td></tr><tr><td>Web Server/HTTP proxy server</td><td>Nginx</td><td></td><td></td></tr></tbody></table>


# About Github Repositories


# openg2p-registry


# openg2p-program


# Deployment Guide

Work in progress

## Introduction

To deploy OpenG2P for sandbox, staging and production environments refer to the [Deployment on Kubernetes](/1.0.0/guides/deployment-guide/deployment-on-kubernetes) guide.

To install OpenG2P on your work machine for development refer to the [Getting Started](/1.0.0/guides/developer-guides/getting-started-1) guide in the Developer Zone.

&#x20;&#x20;


---

[Next Page](/llms-full.txt/1)